31 December 2008

Things That Just Make Life More Wonderful

From Before and After Photos of the Kitchen


For example, this lovely spice cabinet that John made all by himself (and painted it the same color as the kitchen trim, Acadia White, by Benjamin Moore). Here are some more photos of my newest favorite kitchen item.

From Before and After Photos of the Kitchen


From Before and After Photos of the Kitchen


Just chalk it up to reason number 6,794,281,098 why I think John's the greatest.

Other things that make life more wonderful?

1. In 19 days, I start back to school to pursue a master's degree in Library and Information Science at Rutgers (too exciting!)
2. My in-laws were exceedingly generous this year, so a new micro-computer and color printer will be arriving on Friday.
3. A new cookbook landed on my desk the day before we left on our Utah vacation, so there will be a review and a new agave-nectar recipe here soon.
4. An over-due product review also will be posted in the next couple of weeks. (If you love, love, love macaroons, you will want to stay tuned.)
5. Finally, I'm truly fortunate to be starting a new year off again with my wonderful husband John, good health, a positive view of life, a case full of agave nectar, and you lovely folks to inspire me.

Wishing you all a very happy and healthy New Year!

20 December 2008

Vegan Carob Cake with Fudgy Carob Frosting

From Vegan Carob Cake


Here's the recipe I promised from my last post. It's based loosely on the Chocolate Layer Cake with Chocolate Frosting in The Angelica Home Kitchen cookbook.

Caveats: This is a time consuming recipe, especially the frosting part. Things will look very weird at several points in the recipe. Trust me, it will all work out just fine. I wish I'd taken photos of the weird stuff, but I didn't. So here's a weird-ish photo to show you what I mean:

From Vegan Carob Cake


See how the top of the layer looks lumpy? Well, it's even lumpier going into the oven. Don't panic at all about this. There's some real magic that goes on between the apple cider vinegar and the rest of the cake. It leaves it all moist and wonderful. Besides, no one will see the lumpishness. The frosting takes care of it.

Speaking of the frosting, there is definitely enough to cover your cake lavishly. You can definitely be generous when you're smearing it on.

OK. Now for the recipe.

Vegan Carob Cake with Fudgy Carob Frosting


Serves 12

Cake Ingredients:

2 cups whole wheat flour
2 cups all purpose flour
1 1/2 tablespoons baking powder
2 teaspoons baking soda
1 cup carob powder
2 teaspoons cinnamon
1 teaspoon salt
1 cup oil (I used grapeseed.)
2 cups agave nectar (I know this sounds like a lot, but the original called for 3 cups of maple syrup -- an expensive recipe, for sure. Still, it's a LOT of cake.)
2 teaspoons apple cider vinegar (Don't omit this ingredient, whatever you do!)
2 tablespoons vanilla
2 cups filtered water

Frosting Ingredients:

6 tablespoons agar flakes
1 1/2 cups water
3/4 cup carob powder
3/4 cup agave nectar
Pinch of salt
1 1/2 teaspoons vanilla
4 1/2 tablespoons arrowroot powder
6 tablespoons almond milk (or whatever non-dairy milk you prefer)

Cake Directions:

1. In a large bowl, sift together all the dry ingredients. Give them a stir for about 2 minutes, until all the ingredients are evenly distributed.
2. In a medium bowl, using an electric mixer, mix the wet ingredients for 3 to 5 minutes, until they are well combined.
3. Stir the wet mixture into the dry mixture. Here's where things are very weird. It's going to be extremely lumpy. Don't overmix this no matter what your head tells you. Mix until the dry ingredients have been moistened -- about 3 minutes.
4. Let the cake batter rest a few minutes while you preheat your oven to 325 degrees F and oil and flour your two 9-in. cake pans. You definitely want to line the bottoms of your pans with a circle of parchment paper as well. Trust me on this. The cakes WILL stick if you don't.
5. When the pans are prepared, pour the batter into the pans. Don't be concerned that there is a lot of batter, it won't over flow. However, feel free to put the pans on top of a cookie sheet with a lip.
6. Bake the cakes for 35 minutes or until a tester comes out with just the barest of crumbs. Do NOT open the oven for the first half hour. This important for the lump-killing abilities of the cider vinegar. You will regret it if you don't leave the layers alone.
7. Cool the layers completely before frosting.

Frosting Directions
:

If you thought the lumps were weird, strap in -- it gets much weirder.

1. In a medium saucepan over medium heat, whisk together the agar and water until the agar has dissolved. If you haven't yet worked with agar, you're looking for something akin to a mucous-y consistency. Sorry, but that's probably the best comparison I can think of at the moment. Feel free to add yours in the comments.
2. Whisk in the carob powder, agave nectar, salt, and vanilla, mixing well as the mixture simmers. Make sure you get all the lumps of carob because these will show up later if you don't.
3. In a little bowl or a liquid measuring cup, dissolve the arrowroot in the non-dairy milk.
4. Add the arrowroot mixture to the saucepan, and continue stirring until the whole thing thickens a bit. It doesn't take long -- only about a minute.
5. Pour the mixture into an oven-to-table-to-refrigerator pan or baker, then chill it in the refrigerator until it sets. This could take up to an hour. Play it safe and leave it in there for an hour.
6. Just when you thought you were done... Take the set almost-frosting out of the fridge and cut it into 1-in. squares. Load the squares into your food processor or blender and puree until smooth. This may take a few minutes. It took about 10 minutes for mine to get completely smooth. However, there were lots of air bubbles in the frosting that you can see in this photo:

From Vegan Carob Cake


7. Gently remove the cake layers from their pans and place one layer upside down onto your cake plate. Using an offset spatula, spread the frosting generously on the top of the layer. Gently place the second layer on top of the frosting, then generously frost the top and sides until the cake is completely covered in luscious frosting.
8. Enjoy!

From Vegan Carob Cake

18 December 2008

Love Letter to a Vegan Carob Cake Baker

From Love Letter to a Carob Cake Baker


I'd baked this cake:

From Vegan Carob Cake


for Ken and Tanya who visited a couple of weeks ago, but had about that much left over. So, I took this very rich, moist, and surprisingly low fat vegan carob cake with me to the co-op so that other folks could enjoy it.

I wrote the note on the left side of the first photo: "Hi! I'm a vegan carob layer cake with yummy carob fudge frosting. Made with agave nectar + love. Please enjoy me + please save the container for Deb. Thanks!"

From Vegan Carob Cake


When I returned for my next shift, the following love letter was left for me:

"Deb Schiff
Thank you for the amazing cake and the yummy baklava [which I'd left on another, previous shift]. It brightened our days and filled our tummies with yummy healthy goodness. You make us forget that it's sometimes difficult to be vegan. We wish there were more bakers like you.
Love,
Melissa and Stephanie
P.S. Keep up the good work!"

I nearly cried. OK, I got downright misty. Makes it all worthwhile, really.

The cake took a crazy amount of time to make, but I'd make it all over again for those very appreciative young ladies.

I promise to publish the recipe as I made it soon. I just wanted to share that with you because it means so much to me. My wish for you, my fellow bakers and cooks, is that you get as much love back for your treats as I have. I'm an incredibly fortunate person.

07 December 2008

Madhava's Craig Gerbore Responds to Agave Nectar Controversy Here

For the past few weeks, I've had the pleasure of corresponding with Madhava Agave Nectar's President, Craig Gerbore. Unfortunately, our conversations came about because there are a number of articles out on the 'net that are factually untrue. I contacted the company in order to find out 1. if Madhava was crafting a response to the rumors, and 2. exactly what is true/untrue. I'm very glad I did because Mr. Gerbore contacted me himself and provided me with a hefty bit of information which clears up much of the mess.

The whole thing is a bit (ehem, pardon the pun), sticky. If I link to the original, highly controversial and factually incorrect article published at NaturalNews.com, I feel that I'd be promoting the circulation of the errant piece. However, in order for you, my kind and lovely readers, to truly understand how this discussion came about, you should see the article that spawned this action. So, open up a new window when you click on this link, so you can compare Mr. Gerbore's response below with the original. It's eye-opening, to say the least.

One last thing before I share Mr. Gerbore's response. As a journalist and a professional editor who has worked for some top publications in their fields, I'm pretty disgusted with the NaturalNews's editor for even publishing such a patently one-sided story. Truly yellow journalism at its smarmiest.

That said, here is Mr. Gerbore's response completely unedited by me:

Agave Nectar: Hold on now…
Response to Rami Nagel’s article
By Craig Gerbore, President of Madhava

In response, I must first point out that Mr. Nagel’s article is based on the view of a sole individual, Russ Bianchi. I suppose we should thank Mr. Bianchi for pointing out some issues that may have contributed to Iidea’s (the initial manufacturer of blue agave nectar) demise from the market, however I want to be clear, this is not about Madhava or our agave nectar. Once a dominant supplier, as of this past summer Iidea is no longer a major supplier in the agave syrup business. The distributors using them as a supplier have quietly switched to newly formed blue agave companies for their supply. Madhava has always worked exclusively with Nekutli, the producer of agave nectar from the agave salmiana, a very different species of the agave.

However, there is no mention of our agave nectar from salmiana in the article, nor of the differences in the plant, the collection and production of our product. So, the author has blurred the line with his all encompassing attack on blue agave nectar, by his failure to present complete information on the subject of agave nectars. For what purpose was this article written? If it were to educate the public, I think it would include all the information available. With the errors and misstatements and half-truths, I don’t think this article is about education, it is an all out shotgun attack.

I believe Mr. Bianchi, presented as the sole authority on agave nectar, was initially introduced to Iidea’s blue agave syrup product on their entry to the market in the late 90’s. At that time, Iidea was promoting a 90% fructose agave syrup. This is what I believe Mr. Bianchi is referring to. Unfortunately, he ignores the fact that this is not the agave sold on the market today, nor is it representative of Madhava’s product. In fact Mr. Bianchi has never even acknowledged the existence of our agave nectar from the salmiana variety. So, all his comments are apparently based on his experience with Iidea’s product, but I find ourselves caught in the blast.

In their zestful attack against the blue agave syrup he was introduced to initially, Mr.’s Bianchi and Nagel have also made inaccurate comments which reflect on agave nectar generally. As such, I take issue with several of their statements and claims and want to clarify some things as regards Madhava’s Agave Nectar from agave salmiana.

Their discussion of the processing of agave nectar is in no way reflective of how Madhava’s agave nectar is produced. There are three ways to convert complex sugars into a simple sugar sweetener such as agave syrup. It can be done thermally, chemically, or enzymatically as ours is. There are no chemicals whatsoever involved in the production of Madhava’s agave nectar from agave salmiana, nor is it cooked. Our agave is subject only to low temperatures during the evaporation of excess water from the juice.

The author states “The principal constituent of the agave is starch, such as what is found in corn or rice.”

This statement, which is the foundation of much of their argument comparing agave nectar to corn syrup, has no basis in scientific fact, THERE IS NO STARCH IN THE AGAVE.

How can the author and his source be so mistaken on this statement on which he bases his attack?

All plants store energy in one of two ways, as starches or fructans. All agave plants create fructans as their energy storing means.

So, agave plants have fructans, not starch. From Wikipedia: Inulins are a group of naturally occurring polysaccharides produced by many types of plants. They belong to a class of fibers know as fructans. Inulin is used by some plants as a means of storing energy and it typically found in roots or rhizomes. Most plants which synthesize and store inulin do not store other materials such as starch.

There is no starch in either species of agave, and agave nectar is not from starch as the author and Mr. Bianchi claim. They have tried very hard to propagandize the public with a false fact, either by design, or ignorance, for which there would be no excuse.

Such an error of fact certainly casts doubt on the validity of the rest of Nagel’s article, as the lack of depth of his research has to be apparent to all. Really, he is just regurgitating the singular views of Mr. Bianchi.

I personally spoke with the author during his “research”, as did at least one other in the industry. He chose not to include one word of the information given to him by us, which I will repeat below, and failed to make any distinction between Madhava’s Nekutli agave nectar from salmiana and that from the blue agave plant. He only mentions blue agave. The plants differ, the locations differ, the methods and production differ greatly. The information we gave him did not fit his purpose and so was omitted in favor of a generalized attack.

Madhava’s source is exclusively agave salmiana. If you haven’t already reviewed our site at www.madhavasagave.com , you will find background information there. Briefly though, the native people supplying the juice collect it from the live plant, by hand, twice daily. There is no heat involved in the removal. The juice is immediately brought to the facility to remove the excess water as it will ferment rapidly if left standing. It is during the removal of the moisture that the only heat is applied. The juice is evaporated and moisture removed in a vacuum evaporator. The vacuum enables the moisture to be withdrawn at low temperatures. The temp is closely controlled. Subsequently, our agave is handled and packaged at room temperatures. No other heat is applied. And, rather than convert the complex sugars of the juice thermally, we use gentle enzymatic action. Just as a bee introduces an enzyme to flower nectar to make honey, we introduce an natural organic vegan enzyme for the same purpose. The technical term for the conversion of complex sugars into their simple sugar components is hydrolysis. Inulin is a fructan which is hydrolyzed into the simple sugars composing agave nectar, fructose and glucose. Honey is composed of the same simple sugars.

The blue agave plant is harvested and the blue agave nectar is produced by a completely different method. I will have to leave it to the blue agave nectar sellers to comment on the production themselves. While I know of it, I have not witnessed it as I have Nekutli’s. Unlike the author, I won’t comment publicly on something I cannot verify.

To clarify further on another claim, “Agave Nectar as a final product is mostly chemically refined fructose”. As regards Madhava’s agave nectar, there are no chemicals involved in our production whatsoever. The sugars in our agave nectar come from the breakdown of the inulin molecule through the introduction of the enzyme to break apart that molecule. It is in no way chemically refined, there are no chemicals involved in any part of the production or packaging process. Our agave nectar is refined only in as much as the excess moisture is removed from the juice of the plant.

“HFCS is made with GM enzymes”. Bianchi’s states “they (agave and corn syrup) are indeed made the same way” This is another false assertion as regards Madhava’s agave nectar at least. Our agave nectar is certainly and clearly not made the same way as corn syrup. There is no starch in our agave. There are no chemicals, no refinement beyond the evaporation of water. And, there are no GMO’s whatsoever. The agave salmiana has never been subject to this and the enzyme is a natural, non GM organic, vegan enzyme.

Other points regarding fructose apply to sugars in general and are a consumption, or overconsumption issue. Certainly consuming large amounts of sweeteners of any kind will be detrimental to one’s health. Suggesting fructose could cause health issues when concentrated amounts are eaten is a statement which should really apply to the overconsumption issue. The information the author links to agave nectar is the result of megadose testing of pure clinical fructose. Not the same thing as normal daily use of agave nectar in the course of our meals.

The antisweetener advocates just have to admit that it is the overconsumption of sugars that is the problem. Used in moderation, sugars serve a purpose, to make other foods and beverages more palatable. Imagine a world without sweeteners if you can. Affinity for sweet taste is a human trait that most want to satisfy. For those who use sweeteners, there are limited choices available and many choose agave for its particular attributes. It is a good choice. Madhava Agave’s neutral flavor suits the purpose. It is in fact low glycemic, organically certified and non allergenic. Many with diabetes and other special diets find it suitable for their use where other sweeteners are not. It’s easy to use and you can use less.

And, we guarantee the purity of our product. Attached is a letter from the CEO of Nekutli stating this guarantee that Nekutli agave syrup is pure and unadulterated, from the natural juice of agave salmiana.

While it remains up to the individual to maintain balance in their diet and monitor their overall consumption of sweets, Nekutli/Madhava’s Agave Nectar does have advantages over other sweeteners and that is why it has become so popular and
received so much attention today.

I think the information I have brought to light here clearly contradicts the claims contained in Rami Nagel’s article. Thank you for your consideration.


I am grateful for the opportunity to participate in the clarification of this issue because I regularly use agave nectar, especially the Madhava brand. It's good to know a company president who not only stands behind his product, but who has the class to respond directly to a question from a customer.

Your thoughts?

01 December 2008

Veganized and Agave-Sweetened Baklava

From Vegan Baklava


Turns out, I was able to contribute to Thanksgiving after all. As you can read (and see) on Here and There, I've had a functioning kitchen for a week now.

One of the recipes I didn't get to make during my Making Over Martha month was baklava. First, I wanted to use agave nectar as the sweetener, and second, I wanted to veganize it. Both were tall orders, but I was able to produce a more-than-edible dessert for Mom's Thanksgiving.

I made significant changes the recipe, but you can find the original in the November 2008 issue of Everyday Food magazine under Cinnamon-Walnut Baklava. Here's how I made it.

Veganized Baklava

Yields 24 pieces.

Ingredients:

1 stick Earth Balance buttery spread
1 1/2 cups agave nectar
1 1/2 cups water
Juice of 1 lemon
3 cups walnuts finely chopped
2 teaspoons cinnamon
1 package vegan phyllo dough

Directions:

1. Use a small portion of the Earth Balance to butter a 13 x 9 in. baking dish. Melt the remaining Earth Balance.
2. Whisk together the agave nectar, water, and lemon juice in a saucepan over high heat. Bring to a boil, then turn down the heat and simmer for 15 minutes. Let cool.
3. In a large bowl, combine the walnuts and the cinnamon. Mix well.
4. Cut the phyllo dough so that it will fit the baking dish. Keep the sheets covered by a damp paper or cloth towel.
5. Place one sheet in the dish and using a pastry brush, lightly (this is important!) brush the sheet with the melted spread. Lay another two sheets on top, then spread a coating of nuts and cinnamon on top, cover with another sheet and brush that sheet with the melted spread. Repeat the pattern until the nuts are finished. Finally, top the baklava with a top sheet of dough and lightly brush the top with the spread.
6. While this may seem a little counter-intuitive, cut the baklava into squares before baking it for 30 minutes, until golden brown.
7. Transfer the dish to a wire rack and immediately pour the agave nectar mixture over the baklava. It will sizzle a lot. Let the baklava stand for at least 3 hours before serving.

From Vegan Baklava

23 November 2008

Didn't Win the Pie Contest, But I Now Have a New Countertop

Sadly, I did not win the original pie category of the contest below. However, I'm pretty excited about our new countertop. Come and take a look at it on my other blog, Here and There.

Next up tomorrow, Joe the contractor installs the new faucet, the old garbage disposal, and reconnects the dishwasher. We'll still be living out of boxes though, since he won't finish the cabinets until his final visit. When that will be remains a mystery.

In the meantime, hope you all have a wonderful holiday!

19 November 2008

No Thanksgiving Kitchen for Me

I'm never the host of Thanksgiving anyway, but I usually bake something for the feast at Mom's. However, this year, I'm still kitchen-free, since at the moment, I have the cabinet shells installed, but no counter and no sink. Tomorrow, the sink and counter go in, but I'll have to wait until Monday for Joe the contractor to come and connect the plumbing to the sink.

I've been posting about it all on my other blog, Here and There. And, if you want to see the complete photo album, feel free to check out my Picasa shots of the whole process.

Overall, I just can't wait for it to be done already. I feel like such a whiner, though because it's only been two weeks, and there are folks who don't even have homes or food to eat at all. It's also been hard on my conscience because John and I have been using all these disposable items like paper plates, plastic utensils and bottled water (since yesterday, we have a legitimate use due to a water main break).

In the meantime, I'm just focusing on the positive and donating to the local food bank.

By the way, in case you were wondering, the voting is about to open in The Kitchen Best Pie Bakeoff, and I've entered a pie, so please vote for my pie at The Kitchen. Thanks!

13 November 2008

New Product Review: The Baker Organic Whole Wheat Bread -- Agave-Sweetened Sandwich Bread

Oh happy day! I'm so pleased to tell you how great it is to be able to buy bread in a store! When I found this 100% whole wheat bread in the back of the George Street Coop one morning when I was volunteering there, I told everyone on the shift (because they know of my baking with agave bent and have benefitted from the results).

Usually bread is sweetened with some type of sugar like evaporated cane juice or honey. Not so with this very tasty bread from The Baker Organic. While the 100% whole wheat variety uses agave nectar (and a little barley malt), the 7 grain and fiber as well as the spelt selections add molasses, so be on the lookout for that.

Other agave-sweetened varieties include green tea and gogi berry, and pomegranate and blueberry (next on my list to try) .

The 100% whole wheat is full of wheat flavor, and you can pick up some oaty flavors as well. It toasts great, and makes an excellent peanut butter and apricot spread sandwich. The bread is moist, and not at all dense like most whole wheat bricks. Generally speaking, it's great stuff.

Even though the web site says they only sell to the west coast, I bought this in NJ, so you might just find it near you, too.

For more info, visit The Baker Organic.

07 November 2008

My Pie Cherry Berry Pie Is Being Featured On Apartment Therapy's Best Pie Bake Off!


Earlier in the week, I entered the Apartment Therapy Best Pie Bakeoff with my legendary Cherry Berry Pie.

Here's my entry. So exciting! Wish me luck, and please vote for me on Thursday and Friday, Nov. 20-21! Thanks!

05 November 2008

Please Have Some of My Agave-Sweetened Baked Goods, Your President-Electness

I'm sure I'm not the only one thinking that if I met Mr. Obama and his lovely family, I'd offer them my homemade baked goods (and probably some of my homemade ice cream). I'd ply them with pie. More than likely, I'd even make my extra-special Perfect Vegan Scoop or Mango Sorbet for the President-Elect and his family. I'd probably try to impress Ms. Obama with my healthier, vegan version of cranberry-zucchini muffins. And, I'd definitely send them home with some awesome granola in a Lock-and-Lock container because I care about what they eat for breakfast. (Frankly, I care about what most folks eat for breakfast, but since he'll be running the country, I'd prefer if he had some fiber, vitamins, and tasty bits in his bowl).

Lastly, I am immensely stirred by Mr. Obama's historic victory. I'm grateful to have contributed to it. I've voted for some folks in the past whom I thought would do some world-changing things, and they did. But casting a vote for the first African-American president really takes the cake. Speaking of cake, how about some yummy spice cake, your President-Electness? Seconds? Why, of course!

27 October 2008

Injured, Yet Ever-So Delicious Seasonal Pie

From Island Beach State Park in October, Granola, Pie


Pie! How I love pie. Sigh.

This pie is a bit of a twist on Elise's Old Fashioned Apple Pie. Her crust (as I make it) never fails. Ever. It's buttery, flaky, and rich in that I-know-this-has-almonds-in-it kind of way.

After a recent trip to upstate New York, where I bought local apples at a farmer's market, it was clear I needed to make some apple pie. I also had a container of organic cranberries from the co-op -- they'd need to go in as well. But I thought it would be interesting to add something else. Something with a little zing. Something that would bring the whole pie into focus like nothing else. Dried Bing cherries were the answer.

From Island Beach State Park in October, Granola, Pie


The secret ingredient was pears. Really ripe pears. They sweetened up the cranberries and balanced the whole thing out. I have finally discovered my go-to pie for fall. Although, if you know anything about me by now, you know I'll be tinkering with other pies until I love them as well.

Since my recipe doesn't stray very far from Elise's, I'll simply list my alterations as follows:

In the crust:

1. Instead of all all-purpose flour, I split the difference between ap and whole wheat pastry flour.
2. Instead of the sugar and the water, I used 3 tablespoons of agave nectar.

In the filling:

1. I used about 1/4 cup of agave nectar instead of the 2/3 cup sugar.
2. I added the juice from half a lemon to squeeze over the fruit (although, you could just as easily split open a few cranberries and not have to do that since they have a lot of antioxidants in them).
3. I increased the allspice and nutmeg to 1/2 teaspoon each.
4. I omitted the brandy and vanilla extract.
5. For the fruit, I used 1 cup fresh cranberries, 1 cup dried Bing cherries, 2 pears, and 4 apples (a split between empire and gala).
6. For the egg wash, I used the whole egg and water, not cream.
7. Nearly forgot! I did not use flour as the binder, I used corn starch. This is very important. It's a VERY wet pie. The corn starch does a much better job of gelling the pear and apple juices.

From Island Beach State Park in October, Granola, Pie


After baking the pie, I thought about soaking the cherries separately, but because I combined all the fruits with the lemon juice, spices, and corn starch for at least an hour while I made the crust, they were pretty well soaked. However, you could certainly boil some water, then soak the cherries in the water for 10 minutes, drain them, then add them to the other fruit. It might drain some of the flavor, though. Your decision.

From Island Beach State Park in October, Granola, Pie


My only regret is that I started the baking process with the aluminum foil around the edges of the pie to save the crust from browning too much. In the future, I'd bake it for 15 minutes first, then foil it. That's what caused the injury to the pie. The crust clung to the foil and did not let go when I tried to lift it off to finish the browning. It wasn't too damaged, but it kinda ruined the effect for me. Oh well. I'll just have to bake another.

The reviews of the pie were glowing. My friend Mark, who never ever compliments my baking higher than "It's good," said it was "excellent." In fact, I'm not sure I've ever heard him say anything was excellent, no less my cooking. ;D Last Monday, it didn't last very long at all. I am convinced that this is the best combination of fruits for a fall pie. Well, that is until I figure out another.

What are your favorite pie fillings?

20 October 2008

Update: Spicy, Nutty, Seedy, Agave-Sweetened Granola

From Island Beach State Park in October, Granola, Pie


Update: I mistakenly typed an extra teaspoon of ginger. Caught by my pal Tanya! Correct version below.

Celine wasn't kidding when she said it was yummy stuff. My version is pretty loosely based on her White Chocolate Raspberry Granola. I added spices to mine, though, along with different nuts, more/different seeds, and different add-ins at the end. Oh, and I tripled her recipe because I was making a bunch as a housewarming gift (hint: give them a cool container with the granola; I used Lock and Lock. It's awesome!).

From Island Beach State Park in October, Granola, Pie


I didn't quite realize how much I actually made until I mixed all the dry ingredients together. Tripling the recipe yields A LOT of granola. Good thing it's mighty tasty!

My mountain of granola:

From Island Beach State Park in October, Granola, Pie


I think it's probably more aptly named something like chai spice, but you can decide for yourself. And, don't make the mistake I made by baking it all in one rimmed cookie sheet. Use two. It will go a lot faster if you do.

One final warning: once you try this, you will never buy granola again. The recipe is so simple and flexible, you'll want to try all kinds of combinations of add-ins.

Here's the recipe as I made it.

Spicy, Nutty, Seedy, Agave-Sweetened Granola (based on Celine's White Chocolate Raspberry Granola)

Yields a whopping 120 oz. of tasty, spicy granola.

Ingredients:

3 cups rolled oats
1/2 cup brown rice flour
1/4 cup barley flour
3/4 cup unsweetened shredded coconut (as finely shredded as possible)
3/4 cup chopped almonds
3/4 cup chopped pecans
7 teaspoons sesame seeds
1/2 cup flax meal
3/4 cup sunflower seeds
1/2 cup pumpkin seeds or pepitas (I used pepitas)
1 teaspoon cinnamon
1 teaspoon ginger
1 teaspoon allspice
1 teaspoon nutmeg
1 teaspoon cardamom
1/3 cup oil (I used grapeseed)
1 cup agave nectar
1 tablespoon vanilla

add-ins for the post-baking mix:
3/4 cup apple-juice-sweetened cranberries
3/4 cup dried cherries (I used unsweetened dark sweet cherries from Trader Joe's.)
1 cup unsweetened carob chips

Directions:

1. Preheat your oven to 325 degrees F. Line two rimmed baking sheets with parchment paper.
2. In your largest bowl or a super-large ziplock bag, mix together the top 15 ingredients (all the ingredients up until the oil). Make sure everything is combined very well and that there aren't any hidden flour pockets. They will hide from you.
3. In a much smaller bowl, blend together the three wet ingredients until well incorporated.
4. Add the wet to the dry ingredients and mix really well. This could take a while, so just be patient and put on your favorite music to mix by. If you find that things look a little dry, add a tablespoon more oil and mix it all again.
5. Spread your mix into your prepped cookie sheets. Bake for 15 minutes, then take the sheets out, stir up the granola, then switch the positions of the sheets (top goes on a lower rack) in the oven, and bake for another 15 minutes. Stir once more, then bake until nicely browned--light brown, not dark brown. It should take up to 15 more minutes maximum.
6. While you're baking the final time, mix together the final three ingredients in the biggest bowl you have. When the granola is done baking, slide it off the pans on top of the add-ins in the bowl and stir well.
7. Spread the mixture out in the pans again and let the pans cool on top of wire racks for at least two hours before transferring your granola to airtight containers.
8. Enjoy a small bowlful with some vanilla rice milk right away!

From Island Beach State Park in October, Granola, Pie

15 October 2008

Cookbook Review: Sweet!: From Agave to Turbinado

From Kitchen Cabinets, Upstate NY, Mani Niall's new book


One of my all-time favorite cookbooks is Mani Niall's Sweet & Natural Baking, so when his publisher contacted me about reviewing his new book, Sweet!: From Agave to Turbinado, Home Baking with Every Kind of Natural Sugar and Sweetener (Paperback), I was happy to do it.

The just-out-of-the-oven cupcakes seen above are from Sweet! They are the "Lemon Cupcakes" without the "Mascarpone Cream and Raspberries." I selected the recipe because it's the one shown on the cover, and it's one of the handful of recipes that use agave nectar as the sweetener. While most of the recipes tend to use derivatives of cane sugar, there are some wonderful-sounding recipes for agave nectar. I can't wait to try the rest. It's a very well-written book, and as you can see below, filled with well-tested recipes, flexible enough to stand some serious tinkering. I highly recommend it. It's a great buy on Amazon right now for less than $13!

From Kitchen Cabinets, Upstate NY, Mani Niall's new book


I did eventually frost my lemon cupcakes, but I used neufchatel cheese instead of mascarpone, which was five times as expensive. Also prohibitively expensive were raspberries. I'm sure they would have been delightful, but the budget's a bit tight these days, so I just did without. While everyone was pleased with the flavors, I wished the frosting didn't "melt" as much as it did. I was aiming for the look on the cover of Sweet! Oh well. Next time, I'll use a touch less lemon juice and agave. That should do it.

The cupcakes themselves were fantastic the day I made them. Buttery, with just the right amount of lemon, I had a hard time telling I'd used whole wheat flour instead of the all-purpose called for in the original recipe. They degraded just slightly (only I'd notice) when I served them the next day, making the whole grain a bit more noticeable.

Another key substitution was the 1% fat milk for the whole milk. I'm not sure the milk made a big difference considering all the butter in the recipe, but it may have been able to break down the texture of the whole wheat a bit. I also could have used some lemon juice instead of all the milk, and that would definitely have attacked the whole wheat, but I'll save that experiment for next time. I'd definitely make these again because they were so moist, lightly and refreshingly lemony, and overall, quite the crowd-pleasers. Folks went back for seconds and thirds (bear in mind, I made mini-cupcakes for the crowd).

From Kitchen Cabinets, Upstate NY, Mani Niall's new book


While these appear quite muffin-y, they are definitely cupcakes!

Here's the recipe as I made it.

Lemon Cupcakes with Neufchatel Frosting (inspired by Mani Niall's Sweet!: From Agave to Turbinado, Home Baking with Every Kind of Natural Sugar and Sweetener recipe "Lemon Cupcakes with Mascarpone Cream and Raspberries")

Cupcake Ingredients:

1 3/4 cups whole wheat flour
1 1/2 teaspoons baking powder
1/2 teaspoon baking soda
1/4 teaspoon salt
10 tablespoons unsalted butter
3/4 cup agave nectar
2 large eggs, beaten
1/2 teaspoon vanilla
1/2 cup 1% fat milk
Zest of one lemon

Frosting Ingredients:

1 8-oz package Neufchatel cheese
3 tablespoons agave nectar
2 tablespoons freshly squeezed lemon juice
Zest of one lemon

Directions:

1. Sift together the dry ingredients into a very large measuring cup (makes it easier to pour into the wet ingredients). You'll notice a bunch of bran left over after sifting the whole wheat flour. You can either keep this in the recipe or save it for your morning cereal. It's up to you.
2. In a separate bowl, beat the butter until it's smooth. Mix in the agave nectar, eggs, and vanilla until very well blended.
3. Slowly mix in the dry mixture, then the milk until the batter is uniform (not longer than a couple of minutes).
4. Fold in the lemon zest.
5. Let the batter sit while you preheat your oven to 350 degrees F, and line your muffin pan(s) with baking cups. I used two mini-muffin pans (12 each) and one standard muffin pan (six cups filled, the others I filled halfway with water for baking). This sitting time is very important with the whole wheat. It will help the butter cling to the wheat and keep it moist. Don't skip it!
6. When the oven has reached baking temperature, fill your baking cups about 2/3 full. (I used a small cookie scoop. It worked very well -- 1 scoop for minis and two and a half scoops for the larger ones.)
7. Bake 15 minutes for mini cupcakes and about 20-25 minutes for the standard ones. If you use a tester, it should come out clean.
8. Let the cupcakes cool for 10 minutes in their pans, then take them out and let them cool completely on a wire rack.
9. While you enjoy how wonderful your kitchen smells, make the frosting:
a. Beat the cheese until smooth.
b. Add the agave nectar and lemon juice and beat again until smooth.
c. Frost the cupcakes and gently sprinkle some of the lemon zest on top.
10. Serve and enjoy!

From Kitchen Cabinets, Upstate NY, Mani Niall's new book

09 October 2008

Experiencing Technical Difficulties

After an extremely pleasant weekend with friends in upstate New York, I came home to discover that my laptop was simply not cooperative at all. It turns out, thanks to John's detective work, that my hard drive expired. I sit in front of John's home laptop writing this, hoping not all is lost.

I backed up most things about three weeks ago, but that doesn't count some nice photos and lots of useful emails. Oh well.

All that to say, if you don't see a typical post here for a bit, hang in there. I'll be back up and running soon. Until then, happy cooking and baking to you!

29 September 2008

Final Making Over Martha Month Entry and The Very Good News

From Making Over Martha


The very good news first -- my biopsy results were fine. All was benign. Thanks again for all your support and positive energy.

OK, back to the biscotti...

For my final Making Over Martha Month recipe, I selected the Cardamom Biscotti from the July 2008 issue of Martha Stewart Living magazine. I've made biscotti plenty of times to know that it's a doubly baked cookie with a distinctive crunch. However, I thought these would be very cardamom-y. They weren't. Which leads me to believe that perhaps I need to replace my cardamom powder. On the other hand, these made perfectly serviceable almond biscotti.

I'm not sure I'd make these again because I have a nice biscotti recipe, but nonetheless, they were worth making.

Per usual, I substituted agave nectar for sugar and whole wheat pastry flour for the ap flour. Also, I skipped the final step of brushing the tops with egg wash and sprinkling with sugar because, well, this is no cane sugar land.

Here's the recipe as I made it.

Cardamom Biscotti
(inspired by the Cardamom Biscotti recipe from the July 2008 issue of Martha Stewart Living magazine).

Ingredients:

1 1/4 cups whole wheat pastry flour (plus 2 tablespoons more for shaping the logs)
2 teaspoons baking powder
1 cup almonds, ground to 1/8 inch sized pieces
2 tablespoons ground cardamom
2 large eggs
1/2 cup agave nectar
1 teaspoon vanilla

Directions:

1. Line a baking sheet with parchment paper.
2. In a large bowl whisk together the dry ingredients.
3. In a smaller bowl beat the wet ingredients until well combined.
4. Add the wet ingredients to the dry and mix until well combined.
5. Cover and refrigerate the dough for 15 minutes.
6. Preheat oven to 300 degrees F.
7. Divide the dough in half. On a well-floured surface, shape each half of the dough into a long log. Transfer the logs onto the prepared baking sheet and lightly pat down their tops so that they are slightly flattened. There should be at least 3 inches between the logs.
8. Bake the logs for 25 minutes. Take the logs out of the oven and let them cool for 15 minutes on a wire rack (tip: slide the entire thing -- logs and parchment paper onto the rack to cool. It's much easier to deal with this way.)
9. Transfer the logs onto a cutting board one at a time and make 1/2 to 1/4 inch slices (depending on your preference) of each log.
10. Transfer the slices back to the baking sheet and bake again for 22 minutes. Remove from oven and let cool completely on a wire rack.
11. Enjoy these crunchy cookies with your favorite cold or warm drink!

26 September 2008

We Interrupt Making Over Martha Month for an Important Health Update

I usually like to keep my personal stuff to my other blog, Here and There. However, sometimes it's important to share.

Lately, on Here and There, I've been chronicling my current health challenge -- microcalcifications discovered in my left breast. Yesterday, I underwent a stereotactic breast biopsy to discover if those microcalcifications mean I have some malignant cells there or not. I described the experience in detail on Here and There, so if you or anyone else in your family or your network of friends could benefit by reading it, please send them the link.

For many years, people did not talk about breast issues and died from their silence. I'm committed to sharing about this, no matter what the results because early detection is key to survival.

Next post, I wrap up Making Over Martha Month with a delicious treat -- biscotti!

22 September 2008

Making Over Martha Month: Much Lighter, Nearly Vegan Carob Brownies

From Making Over Martha


It's been a while since I made a nice batch of agave-nectar-sweetened, carob brownies. So, I dug into my Everyday Food magazines and unearthed this recipe for Light Chocolate-chunk Brownies. As you can see from the link, the recipe resides on Martha Stewart's site and Everyday Food is her publication, so this definitely qualifies for Making Over Martha Month.

Before making the recipe, I decided to try to veganize these, and came just shy of doing it because I don't use soy yogurt. If you do, you'll find these easy to veganize simply by substituting the dairy yogurt for soy. The original recipe uses sour cream, but I find that using the Greek-style yogurts does just as well.

I made a lot of alterations to this recipe in an attempt to veganize it, but I also made it even "lighter" by using carob powder and fat-free yogurt. To further increase the health value of these brownies, I added walnuts and used whole wheat flour instead of all-purpose. I know there are some folks who refuse to eat nuts in their brownies. Well, I LIKE walnuts in my brownies, especially when they're as fudgy as these were.

My resulting brownies were definitely "light" while remaining fudgy and moist, thanks to the yogurt and applesauce. Between the carob powder, melted chips and chips sprinkled on top, there was a good amount of carob flavor. The vanilla brought out some of that flavor as well. The best part was that during the time I waited for the oven to come to temperature (about 10 minutes), the whole wheat flour was leveled by the protein in the yogurt. No one, including me, could tell these were made with traditional whole wheat flour. Overall, they were a big hit at the co-op. Nancy even hid my container so that she could take a few home!

Here's the recipe as I made it.

Much Lighter, Nearly Vegan Carob Brownies (inspired by Light Chocolate-chunk Brownies from the Jan/Feb 2008 issue of Everyday Food)

Ingredients:

2 tablespoons olive oil
3/4 cup whole wheat flour
1/2 cup carob powder
1/2 teaspoon salt
1/2 teaspoon baking soda
1/2 teaspoon baking powder
3/4 cup agave nectar
1/2 cup fat-free yogurt (I actually used Cascade Fresh's fruit-sweetened, blueberry yogurt, but couldn't tell at all afterward)
1 teaspoon vanilla
1/2 cup unsweetened applesauce
4 oz. unsweetened carob chips (melt half the chips and reserve the other half for sprinkling on top)
3/4 cup walnuts (I used halves)

Directions:

1. Lightly oil a 9 or 8 in. baking pan.
2. In a large measuring cup (4 cups or larger), sift together all the dry ingredients.
3. In a large mixing bowl, combine all the wet ingredients, including the melted chips, until well blended.
4. Add the dry ingredients to the wet and mix for about 2 minutes.
5. Preheat your oven to 325 degrees F.
6. Gently fold the walnuts into the batter.
7. Spread the batter into the pan, making sure to get it all in the corners. Sprinkle the remaining chips on top of the batter. It's OK if they don't sink.
8. For the first 20 minutes, bake at 325, then lower the heat to 300 and bake the remaining time (about 15 minutes) or until a tester comes out almost clean. You still want a few moist crumbs on the tester.
9. Let the brownies cool completely in the pan before cutting them and removing them with a spatula.
10. Enjoy!

Just as an Aside...
I'll have one more recipe for Making Over Martha Month before September comes to a close, but I made it in advance (this past weekend) because I'm having a procedure done on Thursday, and I probably won't feel like doing much of anything for a little while afterward. I made a commitment to myself (and a few others) to write about the experience and the results, which you can follow that on Here and There.

11 September 2008

Making Over Martha Month: Pâte Sucrée Meets Deb's Magic Plum Pies

From Making Over Martha


I've often seen Martha Stewart's recipes for Pâte Sucrée and Pâte Brisée in all manners of pies, tarts, and things pie-like. However, I've been too intimidated to ever try to make them because I'd have to adjust too much due to the agave nectar substitution. And, to be perfectly honest, I already have a great pie crust recipe.

But, in the spirit of Making Over Martha Month, I dove in to a recipe for Pâte Sucrée in the August issue of Martha Stewart Living magazine. My intent was to make hand pies -- small, fruit-filled pies I could hold in a single hand.

From Making Over Martha


I knew I'd have some challenges with the dough, and I did, but the resulting crust was flaky, buttery, and light -- just as you'd expect of a good pie crust. Most of the directions ended up being pretty similar, but I'll include the way I made it work because there are some important differences.

For example, I used whole wheat pastry flour instead of all-purpose flour. It's a great flour and allows you to add more fiber to your diet (even if it's ensconced in 8 oz of butter). I also used agave nectar for the sugar, dividing the amount in half, as well as cutting the amount of water by half. I also omitted an egg yolk in favor of using the whole egg.

From Making Over Martha


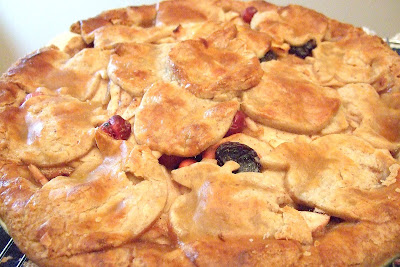
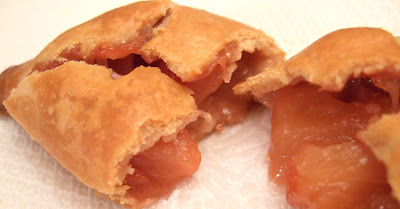
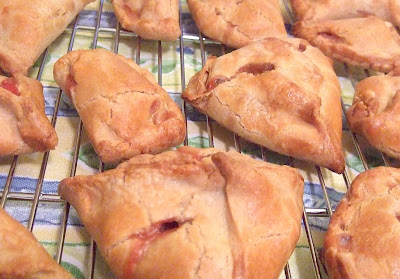
As far as the filling goes, I kept it really simple, using just the fruit, a little corn starch, lemon juice, and agave nectar. The resulting pies were a big hit at the co-op and a gathering last Sunday that my friend Thom hosted. The sweet/tart flavor of the plum filling did a fine job of showcasing the buttery crust. On the other hand, I'd probably fiddle with this a bit more to make the crust more sturdy, yet pliable for hand pies. But, my guess is that it would make an excellent apple pie crust.

Here's the recipe as I made it.

Deb's Magic Plum Handpies, featuring Pate Sucree, inspired by Martha Stewart Living's August 2008 issue.

Makes 12-14 pies, depending on size and shape.

Ingredients:

Crust
1 egg
1 oz cold water
1 1/2 tablespoons agave nectar
2 1/2 cups whole wheat pastry flour
Pinch of salt
2 sticks very cold, unsalted butter
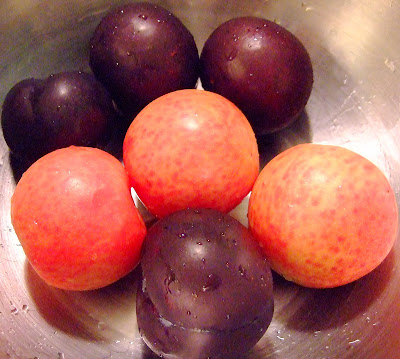
Filling
4 plums peeled and chopped
3 pluots (a new variation on the plum bred with apricots, if your store doesn't carry them, use more plums) peeled and chopped
2 tablespoons cornstarch
Pinch salt
Juice of 1/2 lemon
1 tablespoon agave nectar

Egg Wash
1 egg
1/2 cup half and half
1/2 teaspoon agave nectar


Directions

1. Make crust:
a. Beat together the egg, water, and agave nectar in a small bowl.
b. In your food processor, process the flour, salt, and butter until you see a crumbly texture.
c. While the processor is running, add the liquid to the mixture and process just until the dough forms a ball.
d. Divide the dough in half and wrap each half in plastic, forming a rectangle as you go. Refrigerate the dough for at least one hour.

2. Make filling:
a. In a large bowl, mix together all the filling ingredients until they are
well combined.

3. Make egg wash:
a. Beat together all the egg wash ingredients in a small bowl.

4. Make pies:
a. Preheat the oven to 375 degrees F. Line two baking sheets with parchment paper.
b. On a well-floured surface, roll out the pie crust dough until 1/8 inch thick.
c. Cut either 5-inch ovals or squares, depending on the shapes you want your pies to take.
d. Spoon a small amount of the filling (about a teaspoon or less) into the center of each cut-out.
e. Using a small pastry brush, lightly brush the egg wash along the edge of the top surface of your pie so it can act as a glue when you make your folds.
f. Fold up the edges of your cut-out so that you have an enclosed pie. You may need to crimp your edges if you choose to use an oblong cut-out. Using a sharp knife, make two slits in the top of your pie for steam to escape.
g. Lightly brush the top of your sealed pie with the egg wash until the entire top has a light coating.
h. Repeat steps d - g for each pie.
i. Place each pie on the lined baking sheets and bake for 20 minutes.
j. After 20 minutes, turn down the heat in the oven to 325 degrees F, rotate your pans, and continue to bake for 35 minutes.
k. Let the pies cool on their baking sheets for 5 minutes before gently moving them to racks to cool completely.
l. Enjoy!

From Making Over Martha

07 September 2008

Making Over Martha Month: Veganized Cranberry-Zucchini Muffins

From Making Over Martha


As you may know, during the month of September, I am making over a selection of Martha Stewart's recipes to make them suitable for Altered Plates (my dietary restrictions). This lovely recipe comes from her legendary Baking Handbook. It's one of my favorite cookbooks for a number of reasons:

1. Loads of photos.
2. Great tips and advice.
3. Well-tested (and flexible) recipes.
4. Classic as well as uncommon recipes.

Martha's original recipe for Cranberry-Zucchini Muffins is not vegan, however it didn't take much to rework it to make it super-healthy and vegan. The resulting agave-sweetened muffin is excellent. I received high marks from friends who tried these today, just one day after baking. Right out of the oven (OK, about 20 minutes out of the oven), I couldn't resist trying one since they smelled and looked divine. I was not disappointed.

From Making Over Martha


I could see plenty of green flecks from the fresh, organic zucchini as well as the oozing cranberries that had burst while baking. I could definitely taste the vanilla and nutmeg, while the tangy cranberries and rich, crunchy walnuts made these muffins worth munching.

You really can't ask for a more tender crumb. I'm going to blame it on the olive oil (which you can't taste at all in these, as well as the whole wheat pastry flour). Overall, I'd probably give these an A for sneaky healthiness in a truly tasty muffin.

I made a few changes not only to the ingredients, but also to the instructions. Please bear in mind that I doubled the recipe because I had to feed a room full of friendly faces. So here is my version.

Cranberry-Zucchini Muffins
(based somewhat loosely on Martha Stewart's recipe in her Baking Handbook).

Makes 42 mini muffins and 12 regular-sized muffins.

Ingredients:

3 1/2 cups whole wheat pastry flour
2 teaspoons baking powder
2 teaspoons baking soda
1 teaspoon cinnamon
1 teaspoon nutmeg
1/2 teaspoon salt
1 cup chopped walnuts
1 1/3 cups agave nectar
3/4 cup olive oil
1 teaspoon vanilla
2 cups grated zucchini (I used 2 1/2 small ones)
1 cup frozen whole cranberries

Directions:

1. Line all your muffin pans with nice paper liners.
2. Preheat oven to 325 degrees F. If you're just making large muffins, set your oven to 345 degrees F. The mini muffins take much less time to bake, so the lower temperature helps prevent burning.
3. Sift together dry ingredients (except walnuts) into a large bowl with a lip or a very large measuring cup.
4. Fold in the walnuts making sure to mix them in well. They also help to better distribute all the dry ingredients.
5. In a separate, large bowl, mix together the agave nectar, olive oil, and vanilla until well blended.
6. With a big spoon or silicone spatula, mix in the zucchini.
7. Add the dry ingredients, mixing until just blended.
8. Fold in the cranberries for about a minute.
9. Using a small cookie scoop, scoop out even amounts into your prepped mini muffin pans. Use a regular ice cream scoop for the large muffin pans. Your muffins will rise a bit, so make sure not to over-fill the cups. You're looking for about 3/4 full.
10. Bake for 20 minutes, then rotate the pans and bake another 20 minutes, or until a bamboo tester comes out clean.
11. Let the muffins rest in their pans for 10 minutes, no more. Then remove them from the pans to cool completely on wire racks.
12. Break 'em open and enjoy!

01 September 2008

Making Over Martha Month: Peach Sherbet


Just for fun, I've declared September 2008 to be Making Over Martha Month. That means instead of pulling recipes from a variety of sources as I usually do, I'll just be focusing on altering recipes from Martha Stewart's cookbooks, magazines, and Web pages.

To kick off the month in true summer style, I found a recipe for White Peach Sherbet on Martha's Web site. My agave-nectar-sweetened version is really peachy, rich, and creamy stuff. I noodled around with the recipe quite a bit to the point where it's not really the original at all. Therefore, I've provided my altered version below. Oh, and I didn't use white peaches. The local organic peaches here are yellow and quite delicious.

A note to my wonderful vegan and lactose-intolerant friends: You can easily make this a non-dairy recipe by using a soy creamer, cashew cream, or Mimicreme instead of the half and half.

Peach Sherbet (inspired by Martha Stewart's White Peach Sherbet version)

Ingredients:

5 to 6 large, very ripe peaches
1 large lemon, juiced thoroughly
scant 1/2 cup agave nectar
1 cup half and half

Directions:

1. Using a serrated knife or peeler, gently peel the skin from the peaches and pit them.
2. Put the peach flesh into a food processor and process just until there are no very big chunks left.
3. Pour the peaches into a large bowl and add the remaining ingredients. Hand mix until well combined.
4. Cover the bowl with plastic or pour the mixture into a container with a matching top, then chill overnight in the refrigerator.
5. The next morning, use your ice cream maker (or in my case, your mixer attachment) to freeze the ice cream batter until it is at soft-serve consistency.
6. Serve and enjoy immediately or pack in a freezer-safe container until you can enjoy it later. Just take it out 5 minutes before you intend to serve it so it softens enough to serve easily.

27 August 2008

Vegan Tahini Oatmeal and Cranberry Drops


A few years ago, I found this great recipe at the Whole Foods store Web site. Although the photo they provide doesn't look all that attractive (my cookies are a bit cuter, as far as cookies go), these are quite the yummy bits.

When I read the original recipe again on Monday, I knew that the cookies wouldn't take long to make. I was right; they didn't.

I pretty much used their recipe verbatim except for some pretty important changes:

1. Agave nectar for the maple syrup.
2. Addition of 1/2 teaspoon nutmeg with the dry ingredients.
3. Addition of 1/4 cup fruit-sweetened dried cranberries, also with the dry ingredients.
4. Let the batter rest for about 10 minutes before using a small scoop to drop the cookies onto sheets lined with parchment paper.
5. Heated oven to 330 degrees F.
6. Baked for 7 minutes, then turned the cookie sheets and baked for another 7 minutes.

I found it strange that Whole Foods hadn't spiced these at all, hence the addition of the nutmeg. You could easily add cinnamon as well. I'd probably add even more nutmeg next time. Ginger and allspice might be very interesting. If you make them that way, please let me know. I'd love to hear about it.


The texture of these cookies is very pleasing. Not grainy or gritty, not too chewy -- just perfect. When I passed these out on Monday night, my friends asked me what was in them that they couldn't identify (the tahini) and went back for more. The best part about these cookies is the tang of the cranberries that offers the ideal foil for the richness of the tahini and heartiness of the oats.

Overall, I'd definitely give these an A for 1. speed and ease, 2. flavor and flexibility, and 3. vegan deliciousness.

21 August 2008

Moore Beany Brownies


This insanely fudgy brownie comes from the nifty Jennifer Moore Howe. The wacky thing about these brownies is that they're light and fluffy at the same time. It has to be the 4 eggs. The next time I make these, I'll definitely add walnuts. They are already much healthier than most brownies because they don't contain any butter or oil, but the kicker is that they don't have any flour in them either. They're full of beans!

You'd never know it, either. I brought them to a Board of Directors meeting at the George Street Co-op earlier this month, and they were a big hit. They'd probably be an even bigger hit with some frosting. He, he, he.

Just a baking note -- I'm not sure if this always happens, but my brownies really fluffed up, split at the halfway mark, then settled in to supreme fudgyness. What do I mean by that? Take a look at these photos of the brownies after I pulled them from the oven.


Here's a close-up.


But here's the final texture.


I reworked her original recipe quite a bit, so I'll publish the alterations here.

Secret Weapon Highly Nutritious Brownies (adapted from Jennifer Moore Howe's recipe)

Ingredients:

1 1/2 cups unsweetened carob chips
2 cups black beans (I actually used about 1 3/4 cup of black beans and 1/4 cup kidney beans, and Jennifer's original recipe calls for garbanzo beans.)
4 eggs beaten
2/3 cups agave nectar
1 teaspoon vanilla
1/4 cup roasted carob powder
1/2 teaspoon baking powder
1 tablespoon hazelnut flavored Teeccino (or your favorite instant non-coffee)
optional: 1/2 cup chopped walnuts

Directions:

1. Preheat your oven to 325 degrees F. Line a 9-in. baking pan with parchment paper or lightly oil the pan with canola oil.
2. In your food processor or blender, process the beans until they are smooth.
3. Over a pot of simmering water, place a glass or metal bowl with the chips. Melt the chips, stirring until smooth.
4. Add the melted chips, eggs, agave nectar, and vanilla to the beans and mix well.
5. In a separate, large bowl, sift together the carob powder and baking powder.
6. Add the instant non-coffee and walnuts to the dry ingredients and mix well.
7. Pour the wet ingredients on top of the dry ingredients and mix until well blended.
8. Pour the mixture into your prepared pan and bake for 30 to 40 minutes, or until a tester comes out with a light coating of crumbs.
9. Cool completely on a wire rack.
10. Enjoy!

10 August 2008

Super-Duper Vegan Cookies


These are by far some of the best cookies I've ever had. The wonderful Dreena Burton's Eat, Drink & Be Vegan's "Super-Charge Me! Cookies" are these fantastic lumps of tastiness. They're like the vegan version of the ideal chocolate chip cookie, but far better.

To tell the truth, I wasn't the one who picked out these cookies to make last week; it was my nephew Tyler. We were celebrating his 13th birthday (a bit late) by spending a day together, like we've done each year for the past few years. We also selected a couple of healthy vegetable-based recipes for lunch, but these cookies were definitely the big winner.


Dreena's original recipe calls for spelt flour, but we went for 1/2 whole wheat and 1/2 all-purpose. Tyler liked the result of using the half and half mixture because it gave texture to the cookie along with the oats, carob chips, coconut and dried cherries (a substitution for raisins). We both really enjoyed the chewiness and the richness of the cookies from the cashew macadamia nut butter we used instead of the almond butter. (Source note: Try Trader Joe's cashew macadamia nut butter for any nut butter in a recipe. It works beautifully.)


Finally, the new oven yielded excellent results, taking only 8 minutes to come to temperature. Luckily, I'd tested this early, so I didn't have to waste gas preheating the oven for the length of time it took (relatively short) to prep the cookies for baking.

Otherwise, aside from using 3 oz of agave nectar for the 1/2 cup of maple syrup, we didn't alter the recipe much. Per usual, I dropped the oven temp by 25 degrees F. Usually that means I have to bake the cookies longer, but not so with the new oven. Just 6 minutes, then turn the tray, then another 6 minutes. The cookies baked perfectly!

One last bit -- the recipe calls for flattening the cookies slightly (and rightly so). We forgot that part, but the scoop-shaped lumps we enjoyed were not affected in the least.

Eat, Drink & Be Vegan is very reasonably priced, and I highly recommend buying a copy. You will definitely use it.

05 August 2008

Product Review: Jake's Unbaked Bars


Jake's Unbaked is an ethical, vegan company that makes some of the most delicious, raw-agave-nectar- sweetened bars I've ever tasted. The Yogi Bar, flavored with Masala Chai spices, is crunchy, fresh tasting, and spicy with ginger and pepper. It might well be my favorite.

Jake's Goji bar also has a nice snap to it, but you can really taste the tangy gojis along with the coconut and almonds that are in every bar. As with all the bars, I was especially impressed by how crisp these soaked and low-temperature dried bars are. Some bars can be rubbery, or too sticky to take along on hikes or bike rides. These are just perfect for taking along on trips.

Finally, the Rawnola bar is definitely up there with the Yogi bar, as far as my flavor preference is concerned. Jake's Rawnola takes the best of what a granola bar is about -- flavor, texture, and portability -- and kicks it up a few notches by making it raw.

I can't say enough about these agave-sweetened bars. Of course, I tend to biased toward foods with fewer than 10 ingredients. Overall, they're terrific.

There's only one drawback, and that's a labeling issue. On the Jake's Unbaked Web site, the ingredients are all listed as organic (except the sea salt). The packaging, on the other hand, does not say the ingredients are certified organic (or organic at all). So, I would suggest to Jake that he invest in some new labels stressing the organic-ness of his products, especially since it shows that he puts a lot of time and energy into producing such a nice bar.

Jake's Unbaked

Altered Plates Receives Arte y Pico Award


How lovely! Miss Diva of Beach Eats has bestowed upon me the Arte y Pico award for Altered Plate's "creativity, design, interesting material, and also for contributing to the blogging community, no matter what language." That just about made my day. Everything afterward was simply, well, agave-sweetened frosting!

The original Arte y pico blog primarily a Spanish-language blog (although you will find some Portuguese written there as well), so if you're like me, you might have to visit Google Translate. Arte y pico is well worth a visit because original award recipients are displayed as well as links to blogs you might not visit otherwise.

Because one good turn deserves another, I'll share with you the award rules so you can present Arte y Pico awards yourself!

1. Pick 5 blogs that deserve this award for their creativity, design, interesting material, and also for contributing to the blogging community, no matter what language.

2. Each recipient must list the name of its author and a link to his or her blog to be visited by everyone.

3. Each recipient must show the award and put the name and link to the blog that has given her or him the award itself.

4. Each recipient and the award giver must show the link of the Arte y Pico blog, so everyone will know the origin of this award: http://arteypico.blogspot.com/

5. Each recipient must display these rules.

OK, that said, here are my Arte y Pico award recipients:

1. Ice Cream Ireland -- I can't give these humble ice cream shop owners enough props for their gorgeous photos and well-written prose. Most businesses with blogs don't bother to invest their time and energies into producing a good blog. These fellows are a welcome exception.

2. Joy the Baker -- Beautiful photos, so elegantly staged. Her recipes are paired with stories that are immediately relatable. If nothing else, go for her reports on the Chocolate Chip Cookie Debate (links along the right column).

3. Have Cake, Will Travel! -- Celine's excellent vegan baking/cooking blog will have you in stitches with her hilarious commentary on the recipes. I also love that she uses agave nectar sometimes as well as carob (a rarity). I'd give my bundt pans to be her neighbor.

4. Diet, Dessert and Dogs -- Ricki's recipes are truly innovative, healthy, tasty and very easy on the eyes. Plus, you have to adore her dog photos. Probably the most interesting part of this blog is Ricki's personal journey of weight loss and health. Well worth a day reading and catching up with the story.

5. Cakespy -- A fun blog with excellent interviews, reviews and photos. Definitely THE spot to go for all things cake (especially cupcake). I might just have to purchase some Cakespy art for the new kitchen when it's finished. My favorite posts are those with photos decorated with smiling or grimacing cupcakes. Cracks me up every time!

04 August 2008

Lower-Fat, Lower-Sugar Banana Bread


Once again, I dove into the always-reliable Veganomicon for a good recipe to alter for agave nectar. This time, it was to address an interesting challenge -- what to do with a half case of very ripe bananas. I decided to try a variety of banana bread recipes, including the "Lower-Fat Banana Bread" from Isa Chandra Moskowitz's and Terry Hope Romero's encyclopedic book.


My, this was some tasty banana bread! Of course, it helps when your ingredients are fresh, organic, and pure. Not only was it tasty, but it was moist and light, unlike some gummy bricks that resulted from other recipes I tried.

The only changes I made to the original recipe were:

1. 1/3 cup agave nectar for 1/2 cup sugar and 2 tablespoons molasses.
2. The addition of 1/2 cup unsweetened carob chips.
3. Baked at 350 degrees F for about 40 minutes.

Because I didn't change the recipe any more than those small alterations, I don't feel right re-publishing the original here. Instead, I will recommend strongly that you purchase Veganomicon or borrow it from your local library to try making this delicious banana bread yourself.