07 December 2010

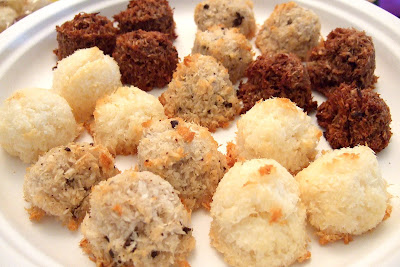
Vegan Cranberry Jammy Thumbprints

From December 2010
These are habit-forming to say the least. Based on the Cranberry Walnut Thumbprint cookies by Isa Chandra Moskowitz and Terry Hope Romero in Vegan Cookies Invade Your Cookie Jar, mine are a bit cakier and don't rely on pre-made, jellied cranberry sauce.

These delicious two biters are best eaten on the day they are made. You can definitely make the dough a day or two ahead of time if you're planning to take these to a party.

Ever since I discovered the joy and ease of making my own jam, I can't resist applying the same principles to other fruits. In this case, I took advantage of the great sales on cranberries and purchased a hefty quantity. I also have been enjoying the marvelous honeycrisp apples making their way to the co-op, so there's a bin full of them in the fridge as well. The resulting cranberry jam is a gorgeous red hue and an excellent tart foil for the buttery taste of the cookies.

Since I made some pretty sizeable changes to the recipe, I'm including my version below. However, that shouldn't stop you from getting your own copy of

Here's my quickie cranberry jam recipe that you'll need to make the cookies.

Deb's Quick Cranberry Jam
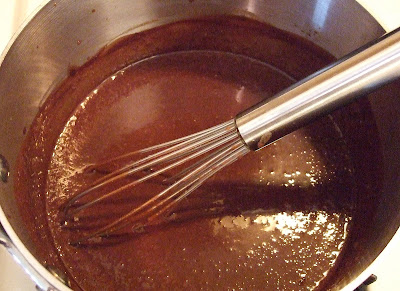
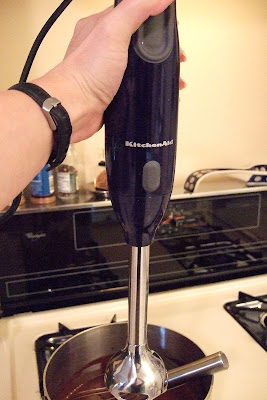
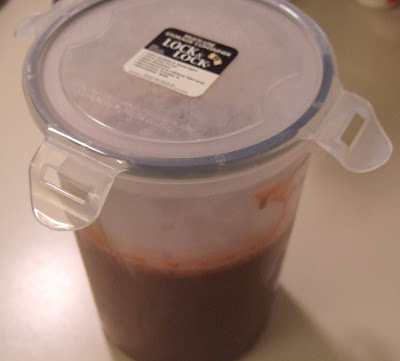
In a blender, empty the contents of one pint package of fresh cranberries, one cored and chopped honeycrisp apple, and one quarter cup of agave nectar. Don't bother skinning anything. You'll only be wasting nutrients and time. Blend until just small pieces show. Empty the blender into a medium saucepan and heat on medium until lightly bubbling. Stir frequently, heating until the mixture thickens. Turn off the heat and let cool while you make the cookies. (By the way, you'll have extra jam. I recommend it spooned over your favorite vanilla frozen dessert or on freshly toasted whole grain bread. Yum!)

Vegan Cranbury Walnut Thumbprints

Yields 3 dozen very tasty cookies.

Ingredients:

1/2 very good olive oil
3/4 cup agave nectar
1/4 cup unsweetened vanilla almond milk
1 1/2 teaspoons vanilla
1 2/3 cups whole wheat pastry flour
1/4 cup coconut flour
1 teaspoon baking powder
1/2 teaspoon cinnamon
1/4 teaspoon freshly grated nutmeg
1/4 teaspoon salt
1 1/4 cups finely chopped walnuts
Freshly made cranberry jam (see recipe above)

Directions:

1. In a mixing bowl, mix together the oil, agave nectar, almond milk, and vanilla until really well incorporated.
2. In another bowl, sift together the flours, baking powder, and spices.
3. Mix the dry ingredients into the wet ones until well incorporated.
4. Place some plastic wrap over the bowl and chill the dough for 1 hour.
5. In the meantime, clean up the kitchen and line three baking sheets with parchment paper.
6. After the dough is nicely chilled, spread the walnuts into a dinner plate. Use a small cookie scoop to scoop the dough into balls and roll the balls around in the walnuts until you have a nice coating on the outside. Place the balls onto the cookie sheets.
7. Preheat your oven to 325 degrees F.
8. Using the second knuckle of your index finger (counting from the hand, not the tip of the finger) (or if you need a device, use a spoon) to make a 1/2 teaspoon-sized indentation into the cookie. It also helps to flatten it out a bit.
9. Spoon 1/2 teaspoon of the homemade cranberry jam into each indentation. You'll need to smooth it out a little because it won't "melt" in that much.
10. Bake the cookies at 325 degrees F for 10 minutes, then turn the cookie sheets and switch their positions. Bake for another 8 to 10 minutes or until they are just turning golden. Bake the last sheet the same way.
11. Let cool on the sheet for 10 minutes, then transfer to wire racks to cool completely.
12. Enjoy!

24 November 2010

Just in case you aren't already elbow deep in flour, cranberries, and other Thanksgiving preparations, here's a savory classic (originally posted on November 8, 2009) just in time:

Vegan Pumpkin Cornbread

From October 2009 Photos

Yep, that's me sneaking a piece of this incredibly delectable, moist cornbread. The original recipe (pre-Altered Plates version shown above) comes from the fabulous Debbie McDuffee's site CliqueClack Food. I made all kinds of changes to the recipe in order to veganize it and make it Deb-friendly. But the result was wonderful.

All the folks at the George Street Co-op who tried the cornbread were very happy with the moistness and the flavors that paired so well -- mainly the corn and the pumpkin. It was a karmic return for the organic pumpkin which I had bought at the co-op while it was on sale. For those of you who may think that organic doesn't make a difference, try organic pumpkin. It's a completely different experience. You can actually smell and taste how squash-y it is. It also has a very realistic color. I ate the leftover pumpkin with some pumpkin pie spice and just a 1/2 teaspoon of agave. It was delightful.

From October 2009 Photos

Just like a typical cornbread, this one is made in a cast-iron skillet. I prepped the pan by oiling it with some grapessed oil and then letting it heat in the oven while it preheated to 375 degrees F. I recommend making it this way because it does two things: 1. It give the crust a nice crunch, and 2. you can't beat how nicely the bread comes out of the pan. Here, I'll show you:

From October 2009 Photos

From October 2009 Photos

Just a note about sweetness, I like my cornbread on the sweet side, unless it features savory ingredients like green onions (heaven!). So, if you're like Debbie and want it to be less sweet, cut the amount of agave nectar.

Finally, sometimes baked good improve over time in a tightly sealed container. The spices take their time melding with the other ingredients, the moisture changes, etc. I wish I could say that I knew for sure that this is one of those recipes, but the batch only lasted two days. You'll let me know, won't you?

Here's the recipe as I made it:

Pumpkin Cornbread (greatly inspired by Debbie McDuffee's recipe of the same name)

Yields 18 wedges

Ingredients:

1 cup whole wheat pastry flour
1 tablespoon baking powder
1 teaspoon baking soda
1 teaspoon salt
1 teaspoon Pumpkin Pie Spice
1 cup cornmeal (next time, I'm using corn flour for a smoother finish)
1 cup pure pumpkin puree
1/4 cup agave nectar
1 tablespoon flaxmeal
1/3 cup olive oil
1 tablespoon apple cider vinegar

Directions:

1. In a large bowl, sift together the flour, baking powder, baking soda, salt, and spice.
2. Mix the cornmeal into the dry ingredients until well blended.
3. In a medium bowl or a very big measuring cup (10 cups or more), beat together the pumpkin, agave nectar, flaxmeal, olive oil, and apple cider vinegar until well incorporated.
4. Add the wet ingredients to the dry mixture and mix until well blended. It will be very thick.
5. Let the batter rest while you oil your cast iron pan and let it heat up with the oven to 375 degrees F.
6. Once the oven is hot, using potholders, take the pan out of the oven and place it on a heat-proof surface. Scoop the batter into the hot pan (please be careful!) and spread it evenly across the pan. It won't fill the pan. It also won't rise much.
7. Bake the cornbread for 20 minutes or until a bamboo skewer comes out clean.
8. Let the cornbread cool in the pan until the pan cools down. Turn it out by placing a flat surface on top of the pan and inverting both. The cornbread should come out cleanly.
9. Cut into wedges and enjoy!

17 November 2010

Yummy Vegan Date-Pecan Coffee Cake

From November 2010

My inspiration for this gigantic cake of deliciousness is the Date-Pecan Coffee Cake on pages 218-220 of The Angelica Home Kitchen. It is truly one of my favorite cookbooks. The recipes can stand a huge amount of tinkering, and are consistently tasty and healthy.

It's a giant cake when you make it in a 9-in. springform pan, as instructed. More than likely, next time I make it, I'll be pouring the batter into cupcake cups.

From November 2010

From the (less than optimal) photo, you can see that the date-pecan-ness is really a ribbon of sweet and crunchy flavor between two very tasty cake layers (you also can see my poor job of unmolding it from the pan). It's almost like a crumb cake, with the soft crumb topping, but with much more flavor. The original recipe calls for maple sugar, but I used agave nectar and some barley malt (which I'll leave out next time, but someone asked me to try it so I did). I also used less agave nectar for the maple syrup, and it worked out just fine. The only other alteration I made was to use Cake Spice instead of cinnamon. But you could easily use Five Spice powder in a 1:3 ratio with cinnamon and get a similar effect.

From November 2010

Since I didn't make that many changes to the recipe, I don't feel right about republishing it here without permission. Instead, I'll strongly recommend that you borrow The Angelica Home Kitchen from your local library (Inter Library Loan, if they don't have it) or buy it online, if you've got the $$$. You could also ask for it as a holiday gift from someone who might need a great gift idea.

Happy Thanksgiving to my American readers!

24 October 2010

Book Review: Fresh and Fast Vegan

From October 2010

Raise your hand if you like rice pudding! (Raising both hands and a foot.) Well, you're really going to like this one from Fresh and Fast Vegan, the newest cookbook from Amanda Grant. I noodled with it a great deal to make it work for me, given my ingredients and budget, but you'll find it quite the tasty pudding.

I'm not sure I'd call it rice pudding, actually. It's more like almond pudding with a big handful of rice thrown in for texture. Speaking of handfuls, Ms. Grant provides a few measurements in terms of handfuls, which I found to be very amusing given the range of hand sizes in folks I know. For instance, 1/2 handful of dried apricots in my hand equals 3.5 apricots. I'm sure my friend Richard's hands would hold more of the dried fruit than that. Come to think of it, I probably would have done well using Richard's hands for these measurements since the end result might have been even more delicious.

This is the second recipe I tried from the book. The first was a butternut squash pie with a crust that turned out very oily for my and Teresa's tastes. However, the pie was gone by the end of the day when I brought it to the Plainfield Public Library for the librarians. I'm hoping they'll enjoy this sweet dessert as well.

The recipe says it serves 4, but I'm not sure that's correct. I ended up with a LOT of pudding, which I estimate at 12 servings. Since my version of the recipe is a bit different than the original, I'm going to post mine here for you to try, with notes on my changes. The next time I make this, I'm definitely using brown rice and more of it. I'd also use more dried fruit just for fun. Otherwise, I'd keep this as is.

Serving note -- the original recipe recommends serving it chilled. After setting, I'd recommend warming it slightly in the microwave. It's better warm.

As far as the recipes go, there's a lot of leeway in the measurements, and the instructions could use a bit more detail. I also found the cooking and prep times to be much quicker than my experience. Teresa said she wanted photos and doesn't like cookbooks without them. However, the recipes are creative and interesting, which is always a plus for a vegan cookbook.

Moroccan Spiced Rice Pudding (my reworking of the recipe originally published on page 182 of Fresh and Fast Vegan by Amanda Grant).

Ingredients

2 tablespoons dried currants (The original says 1/2 handful of raisins.)
2 tablespoons chopped dried apricots (see above for measurement)
3 drops Fiore di Sicilia (The original calls for soaking the dried fruit in orange-flower water, so I made "creamsickle" flower water by using this amazing flavoring.)
3 oz filtered, boiled water
4 cups unsweetened vanilla almond milk (The original uses soy milk.)
4 tablespoons jasmine rice (The original says 3.5 to 5 T, which seems a bit nebulous to me.)
2 tablespoons brown rice flour (The original doesn't specify.)
2 tablespoons filtered water
2/3 scant cup agave nectar (I used light for this, but you could use dark, too. The original calls for 1 cup of turbinado sugar.)
1/2 teaspoon vanilla
1 1/4 cups almond flour (The original calls for ground almonds, but I made flour in my coffee grinder because I had a feeling the consistency might be too grainy otherwise. I'm glad I did.)
1/2 teaspoon Baking Spice (The original calls for sprinkling a little cinnamon on top before serving. I don't like dry cinnamon on anything, so I mixed the spice into the cooked pudding right before turning off the heat, and it worked like a charm.)

Directions
(My directions are loosely based on the original, but I tried to provide more guidance while keeping them simple. All feedback is welcome.)

1. In a small bowl, add the dried fruit, the Fiore di Silicia, and the boiled water and stir. Set aside to let the fruit soak up the flavor.
2. In a medium saucepan, boil 3 of the 4 cups of almond milk. Save the remaining milk for later.
3. As soon as the milk boils, add the rice, cut the heat to a gentle simmer, stir, then cover for 10 minutes. Bring the heat down to low so that the pan won't boil over.
4. Meanwhile, in a medium bowl, mix the rice flour with the 2 tablespoons of water until you have a paste. Whisk in the remaining milk.
5. When the rice is just tender, pour the rice/milk mixture into the saucepan and stir well. Raise the heat to bring the mixture to a low boil.
6. Gently whisk in the agave nectar, vanilla, almond flour, and the fruit. Lower the heat a little so the pan doesn't boil over. You may get some lumps from the almond flour, but whisking will break these up in about 2 minutes. If your pudding hasn't begun to thicken, just keep the heat on medium low and keep stirring until it does (shouldn't take longer than 5 minutes).
7. Stir in the Baking Spice and turn off the heat.
8. Put a trivet on your counter, and place a large glass bowl on top of it. Gently pour the pudding from the saucepan into the bowl and let cool for 20 minutes. Cover, then set in the refrigerator for at least an hour.
9. Serve warmed. (Although you could eat it cold, but it's far superior warm.)

18 October 2010

Vegan Banana Nut Muffins

From October 2010

Boy it's good to be back baking in my own kitchen again! Which is not to say that being in Utah for months wasn't fantastic, because it was. But 1. I haven't gotten the hang of high-altitude baking yet, and 2. I'm quite fond of my kitchen, especially the mixer, the food processor, and the oven.

Since I've been home, I haven't had much time to bake, but I did develop a vegan banana nut muffin recipe that has all kinds of tasty surprises, like carob chips and coconut. I brought a dozen of them to a birthday party where they had a giant cake from BJ's. While some folks tried the cake, the muffins were very popular. I didn't tell my pals that they were doing themselves a favor by eating one -- getting a nice dose of fiber and good fats from the flaxmeal, walnuts, whole grains, and olive oil. But seeing how much my friends enjoyed these moist, yet cakey muffins was enough to spur me to share this recipe with you.

From October 2010

Vegan Banana Muffins
Yields 12 standard muffins and 8 mini muffins

Ingredients

2 teaspoons flaxmeal
3 tablespoons water
1/4 cup olive oil (the fruitier the better)
1/2 cup agave nectar
1 teaspoon vanilla
3 desperately ripe bananas
1/2 cup walnuts
1/2 cup dried, unsweetened coconut
1/2 cup vegan carob chips
2 cups whole wheat pastry flour
1/2 teaspoon salt
1 teaspoon baking powder
1/2 teaspoon baking soda
1 teaspoon Baking Spice (from Pensey's)

Directions

1. Whisk together the flaxmeal and the water, then let stand while preparing the other ingredients.
2. In a large bowl, blend together the olive oil, agave nectar, vanilla, and bananas until well incorporated.
3. In a small bowl, chop the walnuts, and mix them with the coconut and carob chips.
4. In yet another bowl (sorry about that!), mix together the remaining ingredients.
5. Add the nut mixture to the dry ingredients and combine well.
6. Add the flax mixture to the wet ingredients and combine well.
7. Add the dry mix to the wet mix and combine well.
8. Preheat the oven to 345 degrees F and put muffin cups into your pans.
9. Scoop the batter into the cups. They will puff up, so fill the cups only 3/4 full.
10. Bake the muffins at 345 degrees F for 10 minutes, then drop the temperature to 335 degrees F another 10 minutes for minis and 20 for large muffins or until a tester comes out clean.
11. Let cool in pans for 10 minutes before taking the muffins out and letting them cool completely on a wire rack.
12. Enjoy!

04 September 2010

Agave Currant Freezer Jam

From August 2010

Greetings from Utah, where the farmers' markets yield gorgeous fruits, including currants that look more like jewels than edibles. I bought three pounds of these locally grown, magical currants in red, black, and white, fully intending on eating them as is. Then, I was inspired to try making my own freezer jam using agave nectar instead of sugar.

I've read some blog posts on how to do it, but I wasn't sure how to make it work without pectin. I remembered reading once about how apples have their own pectin, and how my mixed fruit pies always benefited from a few chopped apples.

Keeping it very simple, I blended each pound of currants with half an apple and a plum (because they needed to be eaten). Then I scooped the fruit into a small saucepan with about 1/4 cup of agave nectar. I brought the mixture to a boil and simmered it for about 5 minutes before moving it to a container to cool for 5 minutes. Next, I froze the jam for 30 minutes before covering it and freezing it overnight.

From August 2010

I suppose you could strain the stuff prior to freezing it, especially if you really mind the seeds. But I was really looking forward to trying the jam. After letting the jam thaw in the fridge, I could see that it set up just like regular jam, but without all the work.

It's just sweet enough without spoiling the natural tartness of the currants. My favorite was the red -- ruby-colored jam that was a bit more tart than the others. I love it spooned over vanilla Rice Dream. It cuts the rich sweetness perfectly.

Now that I've made my own and discovered how simple it is, I won't be buying unsweetened fruit spreads any more!

01 August 2010

More Fruit-Filled Delights

From July 2010

I'm calling this one the Muesli Pie. It's an experiment of sorts that turned out to be much tastier than I thought it would be.

From July 2010

I started by chopping up a cup and a half of muesli in an attachment to the immersion blender. Moving that to a bowl, I mixed in 2 tablespoons of olive oil and about 3 tablespoons of agave nectar until I had a good crumble going. Then, I patted down a layer of the crumble into the bottom of the pie dish.

I didn't think I'd have enough crumb for the top, so I mixed in about 2/3 cup of unbleached white flour and a bit more oil and agave nectar to moisten the mixture.

From July 2010

I chopped up a green apple, a peach, some strawberries, a handful of Ranier cherries, and some black raspberries, and tossed in some blueberries for good measure. I loaded up the pie plate with the fruit and pressed the crumb mixture onto the top of the pie.

I baked it until it was light golden brown (I probably could have baked it about 10 more minutes) at 325 degrees F, for fear of burning the agave nectar.

From July 2010

It's crunchy and nutty from the seeds and nuts in the muesli, and just sweet enough from the agave nectar (I erred on the less-is-more side because the cereal had dates and raisins in it), and just tart and wet enough from the fruit.

Next time, more fruit, less crumble, and a longer baking time to make the blueberries burst.

11 July 2010

Winner Innards (But I vote no on phyllo)

From July 2010

Over the July 4th weekend, I tried a recipe in a new book by Neal Barnard, called The Get Healthy, Go Vegan Cookbook. The recipe I tried was "Baked Apples in Phyllo Dough."

Since I'm out in Utah at the moment, I had a tough time with the phyllo (Utah's a desert, so it was rough going trying to keep it pliable). But I'm game, so I tried the recipe. Just so you know, I didn't quite follow the directions concerning the innards, but I did follow the folding instructions (which I'd recommend not following given the outcome of the extra-thick, many-layered, dry bottom). First, I cut up two apples (the recommended ones were Jonathan or Rome, but I used Granny Smith because they're such tasty apples when baked), then I mixed in 1/4 cup chopped walnuts, 2 tablespoons of raisins, and about 1 1/2 teaspoons of pumpkin pie spice (because the spices used were all in my pumpkin pie spice).

Then I drizzled 2 tablespoons of agave nectar over the mixture and mixed it until well incorporated. Next came the folding, which I won't repeat here. What I will do is suggest that you leave out the phyllo and just cook the stuff in a small, covered casserole dish in the oven at 350 degrees F for 20 minutes or cook it on top of the stove until the apples are just soft. Then, spoon the tasty filling over your favorite vegan frozen dessert (I like Vanilla Rice Dream for this).

Other options: substitute fruit-sweetened cranberries and toasted almonds instead of the raisins and walnuts; add a little vanilla or orange juice for flavor; make a vegan pie shell, then triple this recipe and use it as a pie filling.

As you can see from the photo, there's quite a surplus of phyllo dough under the fruit packet. But the innards were lovely. I recommend using as little of the agave nectar as possible, since my testers and I thought the end result was a bit sweet.

Overall, there are some pretty interesting recipes and great menu ideas toward the back of the book. There are some ideas I disagree with in the front of the book, but Dr. Barnard's heart's in the right place when he tries to convince folks that vegan choices are great for losing weight and adding more vitamins and nutrients to their diets.

06 May 2010

Good News and Slightly Bad News

My Altered Plates friends, I'm about to become one of those people who say, "I've got some good news and some bad news. Which do you want first?"

Since I typically rip the bandage off all at once, here's the "bad" (not bad, really, just not great for fans of this blog) news -- Altered Plates will be on hiatus for the next few months.

Why? Well, that's where the good news starts. A couple of months ago, I applied for a short-term, very cool position at a great museum, and landed the gig. Yay! So, while I focus my energies on living the exciting life of a working archivist, I'll be taking a break from baking and making homemade desserts.

In the meantime, I'll resurrect my other blog, Here and There, with periodic updates and photos of the upcoming adventure. John keeps calling it an adventure, and he tends to be right about these things, so I've adopted his name for it. Frankly, I'm just so excited and grateful for the opportunity that I sometimes forget it's going to be great fun.

Yesterday, in my last cataloging class, the professor asked how many of us were graduating. About 7 of us raised our hands. Then she asked how many of us had a job. No one raised a hand (I was so caught up in seeing what folks said that I forgot to raise my hand!). All that to say, I'm very fortunate to land even this short-term work in today's iffy job market.

I'll miss my experiments in food chemistry, but I hope that you'll check in with me on my grand adventure now and then on Here and There. Until then, I hope you all have a marvelous summer!

20 April 2010

The Perfect Vegan Scoop (again)

This post originally ran on Oct. 22, 2007. Even after time, the recipe still stands up.Also, if you don't have Mimicreme, you can use coconut milk.

The Perfect Vegan Scoop


This is a double review of sorts, although not so much a review of "The Perfect Scoop," as much as a confirmation of its recipes' flexibility. I was able to completely veganize and make a carob version of David Lebovitz's "Chocolate Ice Cream, Philadelphia Style" without much of a fuss at all. More importantly, I was able to produce a rich, fudgy carob ice cream that is just about the tastiest dessert I've had in a while.

To do this, I used Mimicreme, a new non-soy, non-dairy cream substitute and almond milk for the dairy products. According to the Mimicreme site, the ingredients of the unsweetened version I used comprise: Purified Water, Almonds, Cashews, Bicarbonate Soda, Rice Starch, and Salt. After trying this recipe, I have to say that for the ice cream trial, Mimicreme lived up to its promises. I plan to try it in different applications soon since I have a bit of it left over from this recipe. Any requests for trial recipes??


At first, I had my doubts about Mimicreme since it appeared so gray.


But, I poured out some almond milk and saw that it was around the same hue, and I realized that the color would be completely carob-y when all was said and done. Thus, I stopped fretting about Mimicreme.


One of the primary reasons this recipe is so rich and fudgy is that it contains both carob powder (Dutch process cocoa in the original) as well as unsweetened carob chips. It's a pretty easy recipe, and the most time consuming part of it is waiting for the mixture to chill before freezing it in the ice cream maker. That always takes too long for my taste, so it's best to make it before going to bed, so you can chill your soon-to-be vegan frozen delight over night.

Here's the recipe as I made it:

Ingredients:

2 1/4 cups Mimicreme
6 tablespoons sifted carob powder
3/4 cup agave nectar
Pinch of salt
6 oz unsweetened carob chips
1 cup unsweetened vanilla almond milk
1 teaspoon vanilla paste

Directions:

1. Whisk together the Mimicreme, carob powder, agave nectar, and salt in a large saucepan, heating until it just boils.


2. Cut the heat and whisk in the carob chips until they melt completely. Make sure you use a silicone spatula to get the carob that might stick in the corners of your saucepan.


3. Whisk in the milk and vanilla until completely incorporated.
4. Using an immersion blender or a regular blender, blend the mixture until completely smooth. (I used an immersion blender, but I poured my mixture into the container I would chill it in before blending.)


5. Chill the mixture for at least 6 hours.


6. Freeze according to your ice cream maker's instructions.


7. Enjoy!

13 April 2010

Agave MythBuster at Madhava

If you haven't seen it yet, you should definitely check out Madhava's newest resource on agave nectar, Agave MythBuster. Go now, tell your friends!

11 April 2010

Light As Air Cherry Fig Not-ins

From April 2010 photos
As I've said many times, one of my favorite cookbooks is Vegan with a Vengeance by Isa Chandra Moskowitz. My copy is well worn, especially on pages I've used to make Altered Plates versions of dishes. I've also started to write my alterations on the pages because the slips of paper with my notes sometimes slip out or I make additional changes later.

In the photo above, you can see the outcome of my tinkering with Isa's Fig Not-ins. In my youth, I ate my share of Fig Newtons. These were quite different from the dense cookie of my past. My agave-nectar sweetened cookies were light and fluffy, more cakey than cookie, but lovely.

From April 2010 photos

Because my version uses agave nectar, I was very careful about not letting them brown too much. I'm going to continue to noodle with these a bit because I read on Isa's blog that you could use the dough to make Hamantaschen. My dough was way too wet for that, and I'd like to use coconut oil instead of the shortening to achieve a more butter-like result (however coconutty it may taste).

The cookies have a definite vanilla flavor, but the filling is king. The cherries add a great fruity flavor, while the figs and dates pull it down to earth. These cookies make an excellent light dessert for a big meal or a nice snack on their own.

From April 2010 photos

The upskirt view (can you use that on other descriptions than pizza?) shows how light and cakey this bar cookie is.

From April 2010 photos

Here's a really nice shot of the filling. I used organic Turkish figs and organic Medjool dates from the co-op combined with my favorite dark sweet cherries from Trader Joe's, and omitted the lemon zest. I also used considerably less sweetener overall because the fruit was sweet enough. The most important step here is the blending. I added this because the filling was way too chunky otherwise. As you can see from the photo, I didn't quite divide my dough evenly between the top and bottom, so you might want to do this better than I did (although it didn't affect how tasty these were at all).

Another cookie I used to enjoy as a kid was raisin bars. My mom would by these flat packages of cellophane wrapped bars with a wavy score between each cookie (making them about 3 in. long once separated from their brothers). I'd like to try to replicate those, and will work on that over the summer.

Here is the recipe as I made it, greatly inspired by the Fig Not-ins recipe on page 202 of Vegan with a Vengeance.

Cherry Fig Not-ins
Yield: 24 big cookies or 36 small cookies

Ingredients:
1/2 cup dried sweet cherries (unsweetened), chopped
1/2 cup Medjool dates, pitted and chopped
3/4 cup dried Turkish figs, chopped
1 cup filtered water
2 tablespoons agave nectar

1/4 cup non-hydrogenated margarine
1/4 cup non-hydrogenated shortening
1/2 cup agave nectar
2 tablespoons arrowroot powder
1/4 cup almond milk
2 teaspoons vanilla
2 cups all-purpose or whole wheat pastry flour
1/2 teaspoon baking powder
1/2 teaspoon baking soda
1/2 teaspoon salt

Directions:
1. Combine the first 5 ingredients in a medium saucepan and stir while you heat it to medium.
2. When it starts to bubble, turn off the heat and either use an immersion blender (my choice, but be careful!) or a regular blender to blend all the big chunks out of the mixture. Set the filling aside to cool.
3. With a mixer in a large bowl, whip the fats with the agave nectar for at least 3 minutes, until they are well combined.
4. Mix in the arrowroot, almond milk, and vanilla until well combined. It will look a bit curdle-y, but that's alright.
5. In a separate bowl or a large measuring cup, combine the flour, baking soda, baking powder, and salt until all are incorporated.
6. Add the dry ingredients to wet mixture to form a light dough.
7. With well-floured hands on a well-floured surface, form the dough into a ball and split it into two. Wrap each dough ball in plastic and let it rest and chill in the fridge for at least an hour.
8. When the dough has cooled, take it out of the fridge and its wrapping, and flour a large piece of parchment paper, your hands, and your rolling pin. Take one of the dough halves and roll it until it is about 9 x 15 inches. You can leave this on the parchment paper because it will be your bottom layer. Place this layer on a cookie sheet (I used a pan with 1 in. sides just in case the filling oozed, which it didn't). Roll out your top layer the same way, but set it aside for a moment.
9. Spread the filling thickly, but evenly on top of the bottom layer in the pan.
10. Here's the tricky part, take your top layer, still on the parchment paper, and turn it paper side up on top of the filling layer. Then, gently peel the paper off the top layer.
11. With a pizza cutter, or a sharp, long knife, cut the cookies into the size bars you wish. Do not separate them now. It just makes them super-easy to cut once they are baked.
12. Preheat your oven to 325 degrees F. When the oven is at temperature, bake the cookies for approximately 20 minutes or until lightly browned.
13. Let them cool in the pan for 10 minutes, then using the edges of the parchment paper, lift the entire batch out of the pan and onto a wire rack to cool for an hour before cutting along the same lines you made earlier. Separate the cookies, then let them cool completely.
14. Enjoy!

07 April 2010

Summer Is Here (a bit too early for my liking)

With temperatures in the high 80s, you'll definitely want something cool and refreshing for dessert. Dipping back into my archives, I found just the thing from June 1, 2009, one of my favorite dishes of last year:


Book Review: Ani's Raw Food Desserts

From June 2009 photos

Is that food porny enough for you? You're practically inside this luscious, tropically flavored, raw, vegan dessert fresh from the pages of Ani's Raw Food Desserts. Her Pineapple Icebox Dessert is like a vegan pineapple cheese cake, but way better because the cream is made from cashews, agave nectar, and coconut oil. It's definitely the best cold, non-ice cream dessert I've had in a year.

It's just in time for summer and a perfect bring-along for a party. Although you'll need to pack it in lots of cold packs or ice inside a cooler because this really needs to be kept cold (otherwise it starts losing cohesiveness).

From June 2009 photos

An important thing to remember about this tasty raw dish is that you can serve small portions of it and still be the hit of the party. The Pineapple Icebox Dessert is rich from all the cashews and coconut oil, but the pineapple cuts right through it. While my friend John Leary and I dined on this delectable dessert, I thought aloud about making it with strawberries instead of pineapple. I'm sure it would be equally fantastic.

Just a note about the topping and crust -- I didn't think there was enough, especially in proportion to the pineapple cream. In the future, I'd make more of that and less of the cream. (Although I did double the recipe and put it into a large container rather than the loaf pan she recommends.)

My review comes after the recipe below.

From the book Ani’s Raw Food Desserts by Ani Phyo. Excerpted by arrangement with Da Capo Lifelong, a member of the Perseus Books Group. Copyright © 2009. Find out more at www.dacapopresscookbooks.com.

Pineapple Icebox Dessert

Ingredients:

Crust:
2 cups cashews
Seeds from 1 vanilla bean or 1 tablespoon alcohol-free vanilla extract
2 tablespoons agave syrup

Filling:
1 1/2 cups cashews
1/3 cup agave syrup
1/4 cup liquid coconut oil
1/4 cup filtered water, as needed
2 1/2 cups chopped cored pineapple

Directions:
(In her format, not my usual numbered steps.)

To make the crust, combine the cashews and vanilla in the food processor and chop to a crushed wafer texture. Add the agave syrup and process to mix well. Sprinkle half of the crust onto the bottom of a loaf pan.

To make the filling, combine the cashews, agave syrup, and coconut oil in the high-speed blender and blend until smooth, adding water as needed to create a creamy texture. Spoon the mixture into a mixing bowl, add the pineapple, and stir to mix well. Spoon the filling into the loaf pan and sprinkle the remaining crust on top. Pat lightly. Freeze for 2 hours or until chilled.

Will keep for 4 to 6 days in the fridge or for several weeks in the freezer.

The Review

The minute I saw Ani's book, I felt that there was something familiar about it. It reminded me so much of Vegan Cupcakes Take Over the World that I had to do a side-by-side comparison. The two books are so similar that I looked to see if it was the same designer (it wasn't). Was Ani enamored by Isa and Terry's little book that could? Did they talk to each other about it, I wondered out loud. John (my John, not Leary above) wondered about the legal implications. [Update April 7, 2010, turns out they were published by the same group.]

I'm sure there's nothing nefarious about this lovely, little raw cookbook. It just greatly resembles VCTOTW in format and style. I just have to be careful about where I put this on the shelf -- especially when I'm looking to make cupcakes.

As far as the recipes go, many are very easily made and look fantastic. I'm going to try carob-ing up the Lavender Chocolate Bars because the photos are drool-worthy.

Overall, if you are in the habit of trying new desserts or want to further your foray into the raw food world, this is definitely the dessert cookbook for you. There are plenty of photos and loads of tips, so you won't get lost at all.

[Update April 7, 2010, I'm nearing the light at the end of the tunnel with my work from school. Expect a new recipe within the week!]

27 March 2010

Happy Passover

Hello friends! This entry originally ran on April 20, 2008. Hope you enjoy your festive holidays!


Yes, once again, it's time to remake Martha's macaroons. Since it's such a simple recipe, I started off with a plain version (well, not so plain, as I'll explain below) for 1/3 of the recipe, then I added chopped, unsweetened carob chips after I'd scooped out a pan and one half, and finally, I added 1/4 cup of carob powder to the remaining mixture. The resulting macaroons were moist, with a very special flavor, thanks to Fiore di Sicilia.

I tripled the recipe, but my substitutions below apply directly to the original measurements for your ease of use:

1. 2/3 cup of agave for the 3/4 cup of sugar
2. Organic lite unsweetened shredded coconut for the regular kind (it's much more finely shredded, too!)
3. Chopped, unsweetened carob chips for the chocolate
4. 1/4 teaspoon Fiori di Sicilia for the vanilla
5. I used a teaspoon-sized cookie scoop instead of 1 1/2 teaspoons of the mixture to make my macaroons. This way, they're truly bite sized.

The Fiori di Sicilia did magic things to the macaroons. It made the carob ones taste just like dark chocolate! It also gave the non-carob chip/powder variety a lovely orange flavor that you just can't get from orange zest.

These moist little clumps of coconut went over well at Passover last night. And, I'm bringing more to a party this afternoon. Tripling the recipe allows you about three days' worth of desserts to bring with you to seders. Best of all, this recipe is really a no-brainer and takes only the time to mix, bake, and cool. It's definitely one of my go-to Altered Plates.

Special tip: What the recipe doesn't tell you is that you should let the macaroons cool a bit on the baking sheet parchment paper prior to moving them to cooling racks. This way, you'll have less of a chance of crumpling the little guys.

For those celebrating, I wish you a meaningful and happy Passover!

20 March 2010

Spring Break and My Birthday

This past Monday marked another birthday for me as well as the beginning of spring break at school. Some friends on Facebook asked who was making my cake, and I had to say "no one" because 1. it was true, and 2. I hadn't planned on baking anything that day. However, I did enjoy a breakfast of pancakes (topped with agave nectar) with John. So, I had a little cake, as it were.

Since then, I've been splitting my semester break between homework and projects for school and enjoying the fabulous weather. Yesterday, Tanya and I ventured into NYC for a day on the town. We couldn't have asked for a sunnier spring-like day. We started at the Museum of Art and Design, where there was a truly remarkable cut paper exhibit (you must go see it, if you're in town).

One of the highlights of the trip was dining at Angelica Kitchen on fantastic vegan fare and sharing the best dessert I've had in ages. I confess that it was probably sweetened with maple syrup, but once in a while, I can splurge. It was an apple blueberry crumble pie that was perfect in every way. I'm going to try to duplicate their artistry at home using agave nectar carefully, because the best thing about this pie was that we could taste all of the flavors. It was sweetened very lightly, and spiced even more judiciously. It will take great restraint to recreate this delectable delight. But I'm up for the task.

In the meantime, you might note that my blogging will be a bit uneven. I begin volunteer work in the Plainfield Public Library's archives on Monday as well as work on a pretty intensive project in the Rutgers University archives later in the week -- in addition to my regular schedule of stuff. Oh, and then there's Passover, so no leaven-y baking for me from the end of March through the beginning of April.

All that to say, you may see some seasonally appropriate previously-posted items during the next 7 weeks (in addition to original material) while I endeavor to end the semester and graduate on a high note. Until then, enjoy spring!

10 March 2010

Best Vegan Carrot Cake Ever!


This recipe started out as a highly eggy one with buttermilk, but I did my magic with food chemistry and turned it into a truly tasty vegan delight. I topped it with a tweaked version of the BabyCakes Bakery cookbook vanilla frosting that was much more like coconut frosting because I used coconut milk instead of soymilk.

I'd made the cake to test it for future birthday cakes (especially mine, next week!), and brought it to a big party to try it out on my friends. They loved it, rushing the table for it as soon as I unveiled the thing. Prior to bringing the cake to the party, my friend Rosie and I tried two small pieces. We nearly kept the cake to ourselves, it was that good.

The cake is super-moist and spiced delightfully. The house smelled like a combination of cardamom and gingerbread for two days! I prefer currants over raisins because they don't interfere with the flavor of the cake (like raisins sometimes can). It's definitely not low calorie, but high in good fats and fiber. This will definitely be the one I bake for Mom's birthday in August. She's going to LOVE it.

Caveat about the frosting -- because it gets a bit melty at room temperature, prior to serving the cake, chill it for about 10 minutes to keep it firm without drying out the cake. The coconut frosting is an ideal match for this carrot cake because it's creamy and light, while the cake is spiced up about 3 notches.

Overall, the cake doesn't take long to make, but the frosting needs time to firm up. I actually had to run it through the food processor again before frosting the cake, so it had a whipped texture rather than a smooth one. It really reminded me of the coconut milk ice cream I've been having lately, without being overly sweet.

Because I hadn't made one in a while, I made a short movie of the making of the frosting and the cake (below). Go easy on me, I'm a bit out of practice. ;D Following the movie is the recipe. The recipe for the frosting is here, but watch the movie first for my alterations.


Best Carrot Cake Ever!
Yields two 8-in. rounds of cakey goodness.

Ingredients:
4 teaspoons flaxmeal
4 tablespoons water
2 1/2 cups whole wheat pastry flour
1/2 cup coconut flour (sifted)
2 teaspoons baking powder (sifted)
1 teaspoon baking soda
1 1/2 teaspoons cinnamon
1 generous teaspoon ground ginger
1 1/2 teaspoons ground cardamom
1 teaspoon sea salt
2/3 cup olive oil
1 1/4 cup agave nectar
1/4 cup light coconut milk
1/4 cup apple cider vinegar
1 teaspoon vanilla
1 cup currants
1 cup walnuts (chopped, or as I do it, beaten with a mallet)
6 cups coarsely grated carrots

Instructions:
1. Mix the flaxmeal with the water in a small bowl and set aside.
2. Combine all the dry ingredients until well incorporated.
3. Combine all the wet ingredients and mix well.
4. Add the dry ingredients to the wet ingredients in 3 passes, until just moistened.
5. Fold in the currants and walnuts.
6. Fold in the carrots until they are well distributed in the batter.
7. Generously oil (Smart Balance buttery spread does really well here) and flour the pans and preheat the oven to 335 degrees F.
8. Split the batter between the two pans and bake for approximately 40 minutes, or until a bamboo tester comes out clean.
9. Let cool for 1 hour in the pans, then turn out the cakes onto wire racks to cool completely.
10. Frost the cakes and show 'em off before enjoying!

28 February 2010

Purim!

Back in May 2007, when the Holiday post beow originally ran, this blog was new to the world and I was new to making Hamantaschen with agave nectar. What I learned was that too much coconut flour (used as a way of dealing with too much liquid in a recipe) can make a dough go very stiff. But when life hands me challenges like the one shown in the little movies below, I just make star cookies.

Note to vegans: While looking into veganizing this recipe, I found a very helpful posting at the Post Punk Kitchen that says you can use the dough for their Fig Not-Ins (from Vegan With a Vengeance) as a base instead. However, that uses regular sugar instead of agave nectar. It will require some food science to nail this one down, but I'm up for the challenge! It just might take place after graduation in May.

(By the way, whenever I see these old videos, I laugh at two things -- my wacky presentation style and my old kitchen. I really need to film the next Altered Plates blog post and bring my filmmaking into the next decade!)

Here's hoping you have a wonderful holiday and enjoy this original post from May 28, 2007:

The Hamantaschen That Became Stars

Here's a 15-minute short film in three parts on my experience re-doing hamantaschen from the King Arthur Flour Cookie Companion. The dough didn't turn out to be pliable to fold into the traditional shapes, so I made cut cookies instead. Regardless, they were a huge hit.


25 February 2010

Rerun for Sanity's Sake

One year and some change after posting the original message below, there remains a shameful amount of misinformation about agave nectar on the Internet. While that doesn't surprise me, it does get under my skin now and then. Because I use Google alerts on terms containing "agave nectar" and "agave syrup," I have been able to track the number and type of mentions of the topic (at least as far as Google searches will allow; there are many other resources that are not spidered by Google, but the alerts demonstrate my point clearly enough).

Recently, I've seen more misinformed blog postings than usual, so I thought I'd do a public service and run this piece yet again. I sincerely hope that it clears up misconceptions because that was its original intent.

The original post and its comments is available here.

07 December 2008

Madhava's Craig Gerbore Responds to Agave Nectar Controversy Here

For the past few weeks, I've had the pleasure of corresponding with Madhava Agave Nectar's President, Craig Gerbore. Unfortunately, our conversations came about because there are a number of articles out on the 'net that are factually untrue. I contacted the company in order to find out 1. if Madhava was crafting a response to the rumors, and 2. exactly what is true/untrue. I'm very glad I did because Mr. Gerbore contacted me himself and provided me with a hefty bit of information which clears up much of the mess.

The whole thing is a bit (ehem, pardon the pun), sticky. If I link to the original, highly controversial and factually incorrect article published at NaturalNews.com, I feel that I'd be promoting the circulation of the errant piece. However, in order for you, my kind and lovely readers, to truly understand how this discussion came about, you should see the article that spawned this action. So, open up a new window when you click on this link, so you can compare Mr. Gerbore's response below with the original. It's eye-opening, to say the least.

One last thing before I share Mr. Gerbore's response. As a journalist and a professional editor who has worked for some top publications in their fields, I'm pretty disgusted with the NaturalNews's editor for even publishing such a patently one-sided story. Truly yellow journalism at its smarmiest.

That said, here is Mr. Gerbore's response completely unedited by me:

Agave Nectar: Hold on now…
Response to Rami Nagel’s article
By Craig Gerbore, President of Madhava

In response, I must first point out that Mr. Nagel’s article is based on the view of a sole individual, Russ Bianchi. I suppose we should thank Mr. Bianchi for pointing out some issues that may have contributed to Iidea’s (the initial manufacturer of blue agave nectar) demise from the market, however I want to be clear, this is not about Madhava or our agave nectar. Once a dominant supplier, as of this past summer Iidea is no longer a major supplier in the agave syrup business. The distributors using them as a supplier have quietly switched to newly formed blue agave companies for their supply. Madhava has always worked exclusively with Nekutli, the producer of agave nectar from the agave salmiana, a very different species of the agave.

However, there is no mention of our agave nectar from salmiana in the article, nor of the differences in the plant, the collection and production of our product. So, the author has blurred the line with his all encompassing attack on blue agave nectar, by his failure to present complete information on the subject of agave nectars. For what purpose was this article written? If it were to educate the public, I think it would include all the information available. With the errors and misstatements and half-truths, I don’t think this article is about education, it is an all out shotgun attack.

I believe Mr. Bianchi, presented as the sole authority on agave nectar, was initially introduced to Iidea’s blue agave syrup product on their entry to the market in the late 90’s. At that time, Iidea was promoting a 90% fructose agave syrup. This is what I believe Mr. Bianchi is referring to. Unfortunately, he ignores the fact that this is not the agave sold on the market today, nor is it representative of Madhava’s product. In fact Mr. Bianchi has never even acknowledged the existence of our agave nectar from the salmiana variety. So, all his comments are apparently based on his experience with Iidea’s product, but I find ourselves caught in the blast.

In their zestful attack against the blue agave syrup he was introduced to initially, Mr.’s Bianchi and Nagel have also made inaccurate comments which reflect on agave nectar generally. As such, I take issue with several of their statements and claims and want to clarify some things as regards Madhava’s Agave Nectar from agave salmiana.

Their discussion of the processing of agave nectar is in no way reflective of how Madhava’s agave nectar is produced. There are three ways to convert complex sugars into a simple sugar sweetener such as agave syrup. It can be done thermally, chemically, or enzymatically as ours is. There are no chemicals whatsoever involved in the production of Madhava’s agave nectar from agave salmiana, nor is it cooked. Our agave is subject only to low temperatures during the evaporation of excess water from the juice.

The author states “The principal constituent of the agave is starch, such as what is found in corn or rice.”

This statement, which is the foundation of much of their argument comparing agave nectar to corn syrup, has no basis in scientific fact, THERE IS NO STARCH IN THE AGAVE.

How can the author and his source be so mistaken on this statement on which he bases his attack?

All plants store energy in one of two ways, as starches or fructans. All agave plants create fructans as their energy storing means.

So, agave plants have fructans, not starch. From Wikipedia: Inulins are a group of naturally occurring polysaccharides produced by many types of plants. They belong to a class of fibers know as fructans. Inulin is used by some plants as a means of storing energy and it typically found in roots or rhizomes. Most plants which synthesize and store inulin do not store other materials such as starch.

There is no starch in either species of agave, and agave nectar is not from starch as the author and Mr. Bianchi claim. They have tried very hard to propagandize the public with a false fact, either by design, or ignorance, for which there would be no excuse.

Such an error of fact certainly casts doubt on the validity of the rest of Nagel’s article, as the lack of depth of his research has to be apparent to all. Really, he is just regurgitating the singular views of Mr. Bianchi.

I personally spoke with the author during his “research”, as did at least one other in the industry. He chose not to include one word of the information given to him by us, which I will repeat below, and failed to make any distinction between Madhava’s Nekutli agave nectar from salmiana and that from the blue agave plant. He only mentions blue agave. The plants differ, the locations differ, the methods and production differ greatly. The information we gave him did not fit his purpose and so was omitted in favor of a generalized attack.

Madhava’s source is exclusively agave salmiana. If you haven’t already reviewed our site at www.madhavasagave.com , you will find background information there. Briefly though, the native people supplying the juice collect it from the live plant, by hand, twice daily. There is no heat involved in the removal. The juice is immediately brought to the facility to remove the excess water as it will ferment rapidly if left standing. It is during the removal of the moisture that the only heat is applied. The juice is evaporated and moisture removed in a vacuum evaporator. The vacuum enables the moisture to be withdrawn at low temperatures. The temp is closely controlled. Subsequently, our agave is handled and packaged at room temperatures. No other heat is applied. And, rather than convert the complex sugars of the juice thermally, we use gentle enzymatic action. Just as a bee introduces an enzyme to flower nectar to make honey, we introduce an natural organic vegan enzyme for the same purpose. The technical term for the conversion of complex sugars into their simple sugar components is hydrolysis. Inulin is a fructan which is hydrolyzed into the simple sugars composing agave nectar, fructose and glucose. Honey is composed of the same simple sugars.

The blue agave plant is harvested and the blue agave nectar is produced by a completely different method. I will have to leave it to the blue agave nectar sellers to comment on the production themselves. While I know of it, I have not witnessed it as I have Nekutli’s. Unlike the author, I won’t comment publicly on something I cannot verify.

To clarify further on another claim, “Agave Nectar as a final product is mostly chemically refined fructose”. As regards Madhava’s agave nectar, there are no chemicals involved in our production whatsoever. The sugars in our agave nectar come from the breakdown of the inulin molecule through the introduction of the enzyme to break apart that molecule. It is in no way chemically refined, there are no chemicals involved in any part of the production or packaging process. Our agave nectar is refined only in as much as the excess moisture is removed from the juice of the plant.

“HFCS is made with GM enzymes”. Bianchi’s states “they (agave and corn syrup) are indeed made the same way” This is another false assertion as regards Madhava’s agave nectar at least. Our agave nectar is certainly and clearly not made the same way as corn syrup. There is no starch in our agave. There are no chemicals, no refinement beyond the evaporation of water. And, there are no GMO’s whatsoever. The agave salmiana has never been subject to this and the enzyme is a natural, non GM organic, vegan enzyme.

Other points regarding fructose apply to sugars in general and are a consumption, or overconsumption issue. Certainly consuming large amounts of sweeteners of any kind will be detrimental to one’s health. Suggesting fructose could cause health issues when concentrated amounts are eaten is a statement which should really apply to the overconsumption issue. The information the author links to agave nectar is the result of megadose testing of pure clinical fructose. Not the same thing as normal daily use of agave nectar in the course of our meals.

The antisweetener advocates just have to admit that it is the overconsumption of sugars that is the problem. Used in moderation, sugars serve a purpose, to make other foods and beverages more palatable. Imagine a world without sweeteners if you can. Affinity for sweet taste is a human trait that most want to satisfy. For those who use sweeteners, there are limited choices available and many choose agave for its particular attributes. It is a good choice. Madhava Agave’s neutral flavor suits the purpose. It is in fact low glycemic, organically certified and non allergenic. Many with diabetes and other special diets find it suitable for their use where other sweeteners are not. It’s easy to use and you can use less.

And, we guarantee the purity of our product. Attached is a letter from the CEO of Nekutli stating this guarantee that Nekutli agave syrup is pure and unadulterated, from the natural juice of agave salmiana.

While it remains up to the individual to maintain balance in their diet and monitor their overall consumption of sweets, Nekutli/Madhava’s Agave Nectar does have advantages over other sweeteners and that is why it has become so popular and
received so much attention today.

I think the information I have brought to light here clearly contradicts the claims contained in Rami Nagel’s article. Thank you for your consideration.


I am grateful for the opportunity to participate in the clarification of this issue because I regularly use agave nectar, especially the Madhava brand. It's good to know a company president who not only stands behind his product, but who has the class to respond directly to a question from a customer.

Your thoughts?

19 February 2010

Veganomicon's Pumpkin Crumb Cake with Pecan Streusel

From February 2010 photos

For fans of the Veganomicon or for folks who haven't yet purchased this wonderful collection of tasty vegan recipes, I recommend the easy-to-make Pumpkin Crumb Cake with Pecan Streusel. I wish I'd made more of the streusel because it was definitely the best part. In fact, I'm planning on making a bundt cake using it as a center swirl.

From February 2010 photos

Above is a close up of the yummy topping.


Because I didn't make that many changes to the original recipe, I can't post it here. However, I will post my alterations below. Again, I highly recommend purchasing the Veganomicon for its diverse recipe collection, its very tasty dishes, and its handy guides and useful information along the way.

My changes:

1. Substituted agave nectar for the brown sugar in the streusel.
2. Added 2 tablespoons of barley flour to the streusel.
3. Used vanilla unsweetened almond milk instead of the soy milk in the cake.
4. Cut the oil in the cake to 2/3 cup.
5. Used 1 cup of agave nectar instead of the 1 1/2 cups sugar and 3 tablespoons molasses (it was definitely sweet enough) in the cake.
6. Used 2 1/3 cup pastry flour and 1/3 cup coconut flour for the all-purpose flour in the cake.
7. Baked it for 40 minutes at 325 degrees F.

Overall, the texture was quite moist from the pumpkin. I would probably substitute the spices for 5-spice powder the next time I make this. I also would double the amount of streusel and swirl some of it into the batter before topping it.

14 February 2010

Why We Don't Celebrate Valentine's Day

1. Every day is "Valentine's Day" to John and me.
2. Number 1 is enough.

We have so many reasons to celebrate every day. We are incredibly fortunate individuals. My cup runs over when I think about it (and when I don't).

I could list the multitude of reasons why I regularly wake up feeling very grateful, but it would get too personal for this blog, whose overarching purpose is to introduce new ways of using agave nectar instead of other sweeteners in baking and cooking.

So, instead I'll invite you to leave your gratitude lists in the comments section. I look forward to your notes.

09 February 2010

Vegan Pear-Cranberry Crisp

From February 2010 photos

A few weeks ago, my friends Bo, Rosie, and Tony visited for a celebration of vegan flavors. Now, understand that these folks are not vegan, nor am I, but I wanted to introduce some omnivores to the tastier and healthier dishes that can be found in the strict vegetarian diet. Tony was the most impressed with the massive spread and the dishes that kept emerging from the kitchen. He thought of going vegan right then!

Rosie and Bo were tougher sells, but this Pear-Cranberry Crisp sealed the deal. They enjoyed the granola-y texture and the fruity flavors. They also liked the ginger zip and the overall vanilla taste. It's the perfect warm dessert for a frosty evening (which tends to be the case in February), plus it lets me use up some of the thousand cranberries I froze back in the fall.

The recipe below is inspired by one of the same name found in the sadly out of print The Angelica Home Kitchen from the restaurant Angelica Kitchen down on the Lower East Side of Manhattan. I also made the incredible Walnut-Lentil Pate as well as the Miso-Tahini Spread, which went over very well. (I'll be making the pate again for my mom and Dave's famous Flowers In February party to celebrate their gorgeous orchids blooming.)

From February 2010 photos

Above is another shot of the still-warm crisp topped with 3 small scoops of Vanilla Bean flavor Purely Decadent Coconut Milk frozen dessert. It was heavenly, to say the least. The scant leftovers were fantastic for breakfast the next morning.

Tip: Quick way to chop pecans is not to chop them at all, but to seal them in a plastic bag (or roll 'em up in a towel) and hit them with a mallet.

From February 2010 photos

Pear-Cranberry Crisp
Serves 8

Ingredients:
1 cup old fashioned oats
1/2 cup whole wheat pastry flour
1/2 cup barley flour
1 cup chopped pecans (I pummeled mine with a mallet instead of dirtying a knife.)
1/2 cup sliced almonds
1/4 teaspoon salt
1/3 cup oil of your choice (I used grapeseed oil.)
1/3 cup agave nectar
1 teaspoon vanilla


6 firm pears, cored and cut into 1/2 in. sized pieces.
1 cup cranberries (I used frozen that I'd bought fresh and quick frozen back in November.)
2 teaspoons arrowroot powder
1/2 cup apple juice
3 tablespoons agave nectar
1 teaspoon vanilla
1 tablespoon of freshly grated ginger (the more finely grated the better)
pinch of salt

Directions:
1. Mix the flours, pecans, almonds, and salt together in a medium bowl.
2. In a small bowl, mix together the oil, agave nectar and vanilla (from the top section of ingredients) until well incorporated.
3. Add the liquid mixture to the dry mixture and stir until crumbly. This is your topping. Cover and refrigerate until the next two steps are done.
4. Combine the remaining ingredients in a large bowl and mix well.
5. Lightly oil a 9 x 9 in. baking dish and pour the fruit mixture into the dish. Cover with foil and bake at 350 degrees F. for 25 minutes.
6. Take the dish out of the oven briefly, then sprinkle the crumble on top of the baked fruit. Cover again, making sure the foil does not touch the crumble, and bake again for 20 minutes.
7. Uncover the dish and bake until the topping is golden brown, approximately 15 minutes.
8. Serve warm.