29 April 2007

Carob Fudge


Sometimes I really do miss chocolate. I have fond memories of walking along the boardwalk at the New Jersey shore, inhaling the flavors of the freshly made fudge. I could never decide which was my favorite flavor, so I'd usually spend a little bit more for a variety box. Sweet, creamy, chocolaty stuff that eventually made me sick with a monster headache after I'd finished a few pieces.

Still, I miss the flavor and the consistency of fudge. Of course, there are plenty of companies offering malitol-laden fudge, but that also has awful consequences for me. I won't divulge details here, but suffice it to say that the packages of "sugar-free" sweets with sugar alcohols are labeled as hazardous for a reason.

To develop a fudgy candy that wouldn't have icky and/or painful consequences (even in small amounts), I stepped into the kitchen and experimented. My intention was to make carob fudge. As you can see from the photo above, I got pretty close. Because there's only the dairy included with the carob chips, it's not a creamy-tasting concoction. And, it's a bit more chewy than I'd like for "true" fudge, but it's really close. I'll be experimenting again, especially with different add-ins and alternate proportions of the base ingredients, so you'll see other incarnations of carob fudge in the future.

I deviated from my usual sweetener, agave nectar, and used barley malt. I'll probably try it with agave next time. Which is not to say the barley malt was bad at all, because it wasn't. It just didn't achieve the sweetness profile I was going for in the recipe. I tried it here because I've had it in health food store-bought confections that were really tasty, and thought I could wing it.

Because this recipe yields 15 pretty large pieces, it will be a while before I try my hand at carob fudge again. It's rich stuff, so I can only tolerate a piece a day. Give me a month or so, and I'll be back at it.

Experimental Carob Fudge I


Ingredients:

2 cups unsweetened carob chips
1/2 cup barley malt
3 teaspoons grapeseed oil
1/2 cup unsweetened dried coconut
3 tablespoons carob powder

Directions:

1. Grease an 8-in. square pan.
2. In the top part of a double boiler (or in a glass bowl over simmering water), melt the chips, barley malt and oil. Stir continuously until the mixture is smooth.
3. Mix in coconut and carob powder until well blended.
4. Press into pan and refrigerate until just set.
5. Let the pan come back to room temperature (1 hr) and cut into 15 pieces.

26 April 2007

Inspiration

I recently finished reading My Life in France by Julia Child and Alex Prud'Homme. I'm so glad that I read it now, as I'm in the process of writing my first cookbook (the inspiration for this blog).

Written in the first person, My Life in France provides an incredibly candid view of Julia's exhaustive research into the recipes of her first cookbook and how they would translate from French kitchens to American households. I could hear her voice, that unique voice of hers, in my head as I read about how she and her husband Paul traveled extensively and literally ate life up as they went.

Her descriptions of life in her kitchens (in each of her French apartments), cooking numerous French dishes for the first time and tasting remarkable flavors dished out by other fine chefs are nothing short of inspiring for a writer. I was even more enthused as I learned how exacting an editor she was. As both a writer and an editor, reading My Life in France gave me hope that I really can do this -- even if it takes as long as ten years, like Julia's first book did.

I have many favorite books, but I think that this one tops my list at the moment. And, it's not even a cookbook.

23 April 2007

Making Over Martha's Brownies


Oh Martha! How I wish I could make all the lovely cookies and yummy desserts in your Baking Handbook! Alas, I cannot. It's so hard to alter true butter cookies to suit a liquid sweetener like agave nectar. It will be a happy day for me when a dried agave product comes on the market.

But, thankfully, Martha's "Fudgy Chocolate Brownie" recipe follows a common model for brownies -- melt butter and chocolate together and add the remaining ingredients in stages before baking. I've made quite a few agave-and-carob-laden brownies, but this recipe required the most amount of (ehem) fudging.

The result is a very fudgy brownie with a nice crust. It definitely goes well with a nice glass of vanilla rice milk.

Here's the recipe with my alterations:

Fudgy Carob Brownies

Ingredients:

6 tablespoons unsalted butter
1 cup unsweetened carob chips
1 cup agave nectar
1 teaspoon vanilla paste
3 large eggs
3/4 cup all-purpose flour
1/2 teaspoon salt

Directions:

1. Preheat oven to 325 degrees F. Butter 8-in square baking pan.
2. Boil 2 in. of water in a medium saucepan and turn off the heat. Place the butter and the carob in a glass bowl on top of the steaming saucepan, and stir until the butter and carob are completely melted together and smooth.
3. Take the bowl off the hot water and let cool for 15 minutes.
4. Stir the agave nectar into the mixture until combined.
5. Whisk in the vanilla.
6. Whisk in the eggs until well combined.
7. Gently fold in the flour and salt.
8. Pour the batter into the pan and bake approximately 40 minutes, until a toothpick tester comes out with a few moist crumbs.
9. Let cool, then cut into 16 2-in squares.

Performance note: When using agave to make brownies, do not expect to achieve the cracked top of the typical brownie. It just won't happen. It might be a bit on the soft side, so feel free to make a tasty carob ganache to pour on top!

20 April 2007

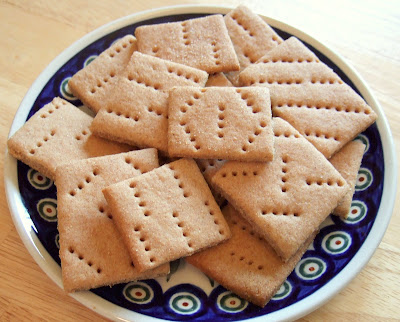
Better Graham Crackers


Almost a year ago, I tried altering another graham cracker recipe that just didn't fly for my husband John (I, however, enjoyed them immensely). Since I've been collecting other graham cracker recipes to try and other cookbooks since that first attempt, I decided it's time to try again.

This recipe comes from the King Arthur Flour Cookie Companion, a great resource for wonderful cookies. I had to make some big substitutions for the recipe to work with agave nectar, but the outcome was a graham cracker that more closely matched John's idea of what one should taste like.

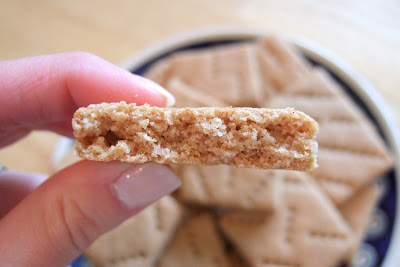
One note of caution, though. I baked these for the prescribed time, but found that their texture was much more like a cookie than a cracker. A day later, I re-baked a few of them in the toaster oven for about 15 minutes, and achieved an ideal cracker consistency. Ideal for me. Not for John, he liked the "cookier" ones better. C'est la vie!


Better Graham Crackers

Ingredients:

1/2 cup all-purpose flour
1 1/2 cups whole wheat flour
1/2 cup agave nectar
1 teaspoon baking powder
1/2 teaspoon salt
1 teaspoon cinnamon
1/2 cup (1 stick) unsalted butter

Directions:

1. Preheat the oven to 300 degrees F. Line two baking sheets with parchment paper or grease lightly.
2. In a medium bowl sift together the dry ingredients.
3. Using a pastry blender, cut the butter into the dry mixture until it is evenly crumbly.
4. Slowly add the agave nectar, mixing it in using a fork.
5. Turn the dough out onto a floured surface and fold it over gently until smooth. [I also used the pie-crust-making technique of using the ball of my hand to mush the butter into the dough further. It really makes a difference in the final product.]
6. Divide the dough in half and on one of the pieces of parchment paper from the baking sheets, roll one piece into a large rectangle, 1/16th in. thick.
7. Use a pizza cutter to cut crackers 2 in. wide x 3 in. long. Don't separate the crackers.
8. Use a dough docker or a straight fork to prick a design into the dough to keep it from puffing up irregularly.
9. Transfer the sheet of parchment paper with the dough to one of the baking sheets.
10. Do the same with the other half of the dough.
11. Bake the crackers for 20-25 minutes, or until they are medium golden brown.
12. Remove them from the oven and let them cool on the baking sheet for 10 minutes.
13. Gently break the crackers on the cut lines and gently transfer them to a rack to cool completely.
14. Enjoy!

A Lovely, Cakey Banana Bread, And a New Product Review


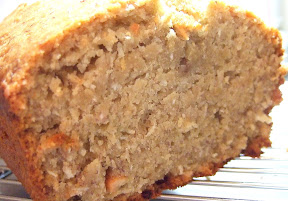
This rich banana bread recipe is much more like a cake than a quick bread. I greatly altered the original recipe I found in Mark Bittman's How to Cook Everything, but like all the recipes I've chosen from that book and altered to suit my restrictions, it worked like a charm. Bittman said that the key to the success of his original is the coconut, "although the butter helps too." Sure it does, Bittman. There's a STICK of butter in that 9 x 5 in. pan!

So, saying it's rich (although I made it richer yet) is pretty much an understatement. But it's so tasty! I wouldn't even put anything on it, exept maybe a simple coconut frosting. I'd be willing to try it in minimuffin pans as tiny banana coconut cupcakes in another try.

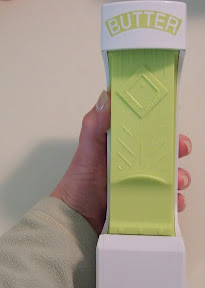
Below is the recipe, followed by a review of the One-Click Butter Cutter that I used while making Bittman's Banana Bread.

Banana Bread

Ingredients:

8 tablespoons (1 stick) of unsalted butter
1 1/2 cups all-purpose flour
1/2 cup whole wheat flour
1 teaspoon salt
1 1/2 teaspoons baking powder
2/3 cup agave nectar
2 egg yolks
3 very ripe bananas
1 teaspoon vanilla paste
1/2 cup dry roasted cashews
1/2 cup grated unsweetened coconut

Directions:

1. Preheat the oven to 325 degrees F and grease a 9 x 5 in. loaf pan.
2. Sift and combine the dry ingredients.
3. Cream the butter and beat in the eggs and bananas.
4. Stir the butter mixture into the dry ingredients until just blended.
5. Stir in the vanilla, then the nuts, then the coconut until just blended.
6. Pour the batter into the loaf pan and bake for approximately 50 minutes. A toothpick should come out with a few moist crumbs.
7. Cool on a rack for 15 minutes until removing from the pan and cooling on the rack until completely cooled.
8. Enjoy!

While I was making this recipe, I tried out the One-Click Butter Cutter.
Here are three very short clips showing how I used the Butter Cutter and what I thought of it.


Welcome to Altered Plates!

Thank you very much for visiting Altered Plates. The mission of this blog is to share with you my experiences altering recipes to meet my various dietary restrictions. I hope you'll enjoy the journey!